
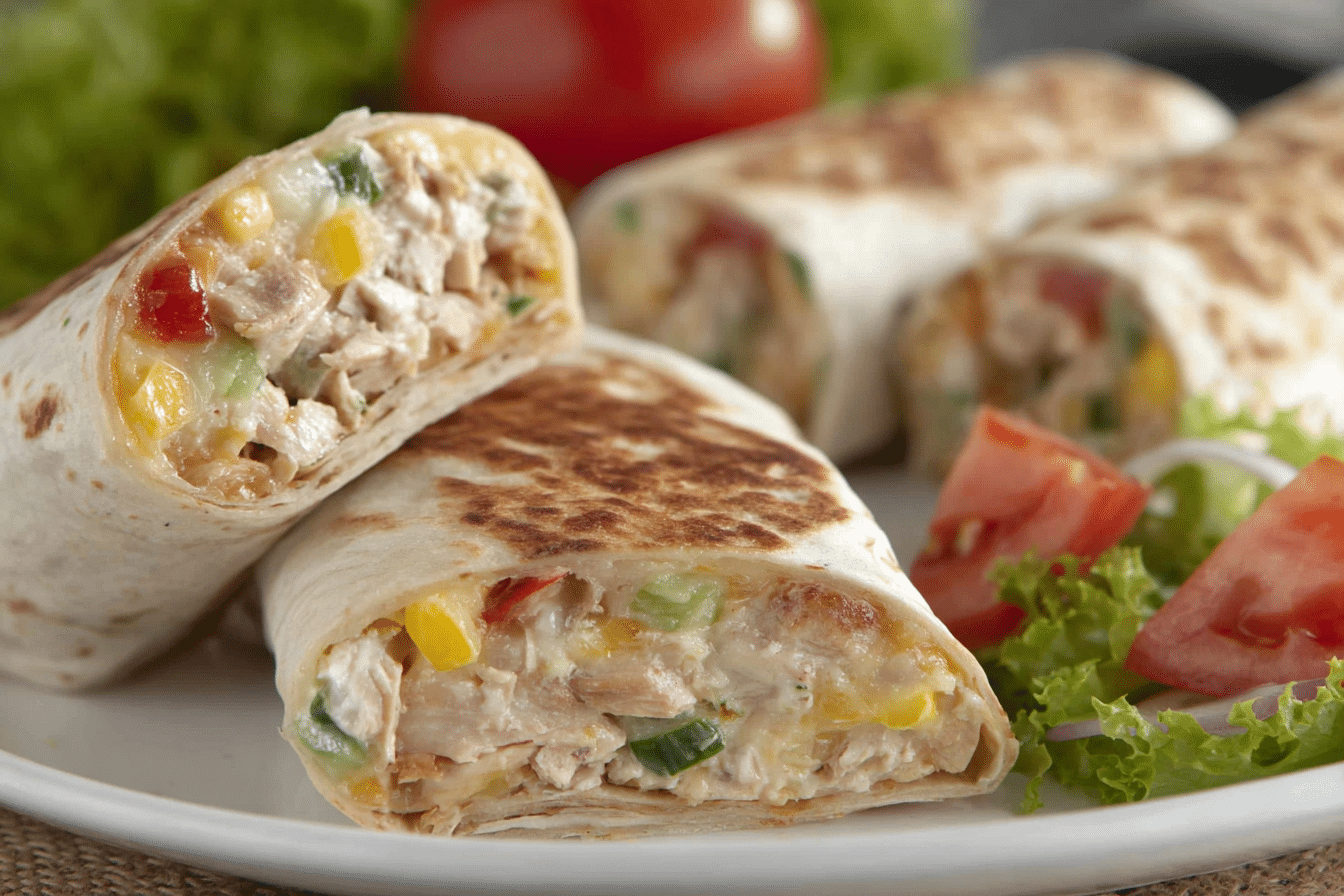
A Tuna Melt Wrap brings together creamy tuna salad, melted cheese, and a warm tortilla for a simple meal that feels comforting and satisfying. It takes the classic tuna melt sandwich and transforms it into a portable wrap that works well for lunch, quick dinners, or easy meal prep.
The filling is rich, creamy, and lightly tangy from mayonnaise and mustard, while the tortilla adds a soft and slightly chewy base. When heated, the cheese melts into the tuna mixture, creating a smooth texture that binds everything together.
This wrap is especially appealing because it comes together quickly with pantry staples. Tuna, mayonnaise, and cheese are common ingredients, making this recipe convenient without sacrificing flavor. A light toasting step adds warmth and helps the tortilla hold its shape.
Another benefit of this wrap is its flexibility. It can be enjoyed hot or cold, depending on preference. When warmed, the cheese becomes gooey and the tortilla slightly crisp on the outside. When served cold, it stays fresh and creamy, similar to a tuna salad roll-up.
It is also easy to customize. Add-ins like celery, pickles, or red onion bring crunch and brightness. Different cheeses can change the flavor profile, from mild and creamy to sharp and bold. This makes the wrap adaptable to different tastes and pantry options.
Overall, the Tuna Melt Wrap is a practical, flavorful meal that balances creamy filling, savory tuna, and soft melted cheese in every bite.
Ingredients Overview
Tuna is the foundation of this recipe. Canned tuna in water or oil works well, depending on preference. Tuna in water creates a lighter texture, while tuna in oil gives a richer taste. It provides protein and a savory base that absorbs seasoning easily.
Mayonnaise brings creaminess and helps bind the tuna mixture. It creates a smooth texture that spreads evenly inside the wrap. Greek yogurt can be used as a lighter substitute, adding slight tang while reducing richness.
Cheese is essential for the melt effect. Cheddar is commonly used for its sharp flavor and smooth melting quality. American cheese offers a creamier melt, while mozzarella provides a milder taste with extra stretch.
Tortillas act as the wrap base. Large flour tortillas work best because they are soft and flexible. They hold the filling without tearing and toast nicely in a skillet. Whole wheat tortillas can be used for a slightly nutty flavor.
Seasonings such as salt, black pepper, and mustard add depth. Mustard gives a mild tang that balances the creaminess of the mayonnaise. Optional ingredients like celery, onion, or pickles add crunch and freshness, creating contrast in texture.
Butter or olive oil is used for toasting the wrap. This step helps create a lightly golden exterior while sealing the filling inside. It also enhances flavor and improves the overall texture of the finished wrap.
Ingredients
1 can (5–6 oz) tuna in water, drained
2 tablespoons mayonnaise
1 teaspoon Dijon mustard
1 tablespoon finely chopped celery
1 tablespoon finely chopped red onion
½ teaspoon salt
¼ teaspoon black pepper
1 cup shredded cheddar cheese
2 large flour tortillas
1 tablespoon butter or olive oil
1 tablespoon chopped pickles (optional)
Step-by-Step Instructions
Start by draining the tuna thoroughly to remove excess liquid. Place it in a mixing bowl and flake it with a fork until the texture is even and broken into small pieces.
Add mayonnaise, Dijon mustard, salt, and black pepper to the bowl. Stir until the tuna is fully coated and creamy. This mixture should be thick enough to hold together without being watery.
Mix in chopped celery, red onion, and pickles if using. These ingredients add crunch and brightness, balancing the creamy base. Stir until evenly distributed throughout the tuna mixture.
Lay the tortillas flat on a clean surface. Divide the tuna mixture evenly between them, spreading it across the center while leaving space around the edges for folding.
Sprinkle shredded cheese over the tuna layer. The cheese will melt during heating and help bind the filling inside the wrap.
Fold in the sides of each tortilla, then roll tightly from the bottom upward to form a secure wrap. Press gently to hold its shape.
Heat a skillet over medium heat and add butter or olive oil. Place the wraps seam-side down into the pan to seal them as they cook.
Cook each wrap for 2–3 minutes per side until the tortilla turns golden and crisp. The cheese inside should melt fully, creating a warm, cohesive filling.
Remove from heat and let the wraps rest for a minute before slicing. This helps the filling settle and prevents it from spilling out when cut.
A common mistake is overfilling the tortilla, which can make rolling difficult and cause tearing. Another issue is using too high heat, which can burn the tortilla before the cheese melts properly.
Tips, Variations & Substitutions
For a lighter version, replace mayonnaise with Greek yogurt. This keeps the filling creamy while reducing richness. A small amount of olive oil can be added for smooth texture.
Different cheeses can change the flavor profile. Sharp cheddar adds boldness, while mozzarella creates a milder and stretchier melt. A mix of cheeses also works well.
Additional vegetables like shredded carrots or spinach can be added for extra texture and nutrition. These ingredients blend easily into the tuna mixture without overpowering flavor.
For added spice, a pinch of chili flakes or a small amount of hot sauce can be mixed into the filling. This brings warmth without altering the overall balance.
Whole wheat or spinach tortillas can be used for variety. They slightly change the flavor while maintaining the same structure and cooking method.
Serving Ideas & Occasions
Tuna Melt Wraps pair well with simple sides such as fresh salad, vegetable sticks, or a light soup. These combinations create a balanced meal without extra complexity.
They work well for quick lunches, casual dinners, or meal prep. The wraps can be prepared ahead of time and reheated in a skillet for a crisp texture.
For serving, slicing the wrap diagonally makes it easier to handle and gives a clean presentation. A small dipping sauce like light mustard or yogurt dressing can be added on the side.
Nutritional & Health Notes
This wrap provides a good source of protein from tuna and calcium from cheese. It offers a balanced mix of protein, fats, and carbohydrates depending on ingredient choices.
Using Greek yogurt instead of mayonnaise can reduce fat content while maintaining creaminess. Choosing whole wheat tortillas adds fiber and improves satiety.
Vegetable additions like celery and onion contribute small amounts of vitamins and minerals while enhancing texture. Portion size can be adjusted based on dietary needs.
FAQs
Can I make tuna melt wraps ahead of time?
Yes, tuna melt wraps can be prepared in advance. It is best to assemble the filling and store it separately from the tortillas. This helps prevent sogginess. When ready to eat, assemble and toast the wrap in a skillet for a warm, crisp texture. If already rolled, reheating in a pan works best to restore structure and melt the cheese again.
What type of tuna works best?
Canned tuna in water or oil both work well. Tuna in water creates a lighter flavor and texture, while tuna in oil offers a richer taste. Both should be drained thoroughly before mixing. Chunk light tuna provides a softer texture, while solid white tuna gives a firmer bite and slightly cleaner flavor.
Can I use different cheeses?
Yes, different cheeses can be used based on preference. Cheddar is most common due to its strong flavor and good melting quality. Mozzarella offers a milder taste with more stretch, while American cheese melts very smoothly. Blending cheeses can create a balanced flavor and texture inside the wrap.
How do I prevent the wrap from falling apart?
To keep the wrap intact, avoid overfilling it and make sure to fold the sides tightly before rolling. Toasting the seam-side first helps seal the wrap. Using a warm skillet also softens the tortilla, making it easier to shape without cracking or tearing.
Can this recipe be served cold?
Yes, tuna melt wraps can be enjoyed cold. When served without toasting, the texture is similar to a tuna salad wrap. The filling remains creamy and flavorful. This option works well for packed lunches or quick meals without reheating.
What vegetables can I add?
Common additions include celery, red onion, pickles, spinach, or shredded carrots. These ingredients add crunch and freshness while balancing the creamy tuna mixture. They should be finely chopped to distribute evenly and avoid overpowering the wrap structure.
Can I make this recipe gluten-free?
Yes, gluten-free tortillas can be used as a substitute. The filling remains the same, so only the wrap base needs adjustment. It is important to choose a flexible gluten-free tortilla to prevent cracking during rolling and cooking.
PrintTuna Melt Wrap Recipe for Fast Work Lunch and Meal Prep
Tuna Melt Wrap is a warm, creamy tortilla wrap filled with seasoned tuna, melted cheese, and crunchy vegetables, toasted until golden and crisp.
- Prep Time: 10 minutes
- Cook Time: 6 minutes
- Total Time: 16 minutes
- Yield: 2 wraps 1x
Ingredients
1 can tuna, drained
2 tablespoons mayonnaise
1 teaspoon Dijon mustard
1 tablespoon celery, chopped
1 tablespoon red onion, chopped
1/2 teaspoon salt
1/4 teaspoon black pepper
1 cup shredded cheddar cheese
2 large flour tortillas
1 tablespoon butter or oil
Optional: chopped pickles
Instructions
- Drain tuna and place in a bowl
- Mix tuna with mayonnaise, mustard, salt, and pepper
- Add celery, onion, and pickles if using
- Spread mixture evenly onto tortillas
- Sprinkle cheese over tuna filling
- Roll tortillas tightly into wraps
- Heat skillet with butter or oil
- Cook wraps 2–3 minutes per side until golden and cheese melts
Notes
Avoid overfilling to prevent tearing. Cook on medium heat for even browning and proper melting.