
Few desserts are as fun, festive, and downright charming as Red Velvet Cake Pops. These little treats pack the rich flavor of red velvet cake and the creamy tang of frosting into a cute, handheld pop — perfect for parties, holidays, or just an afternoon pick-me-up.
Originating from the trend of cake-on-a-stick that swept bakeries in the early 2000s, cake pops are now a go-to for dessert tables and edible gifts. Red velvet, with its signature cocoa-kissed flavor and deep red hue, is an especially popular variation thanks to its eye-catching appearance and nostalgic taste.
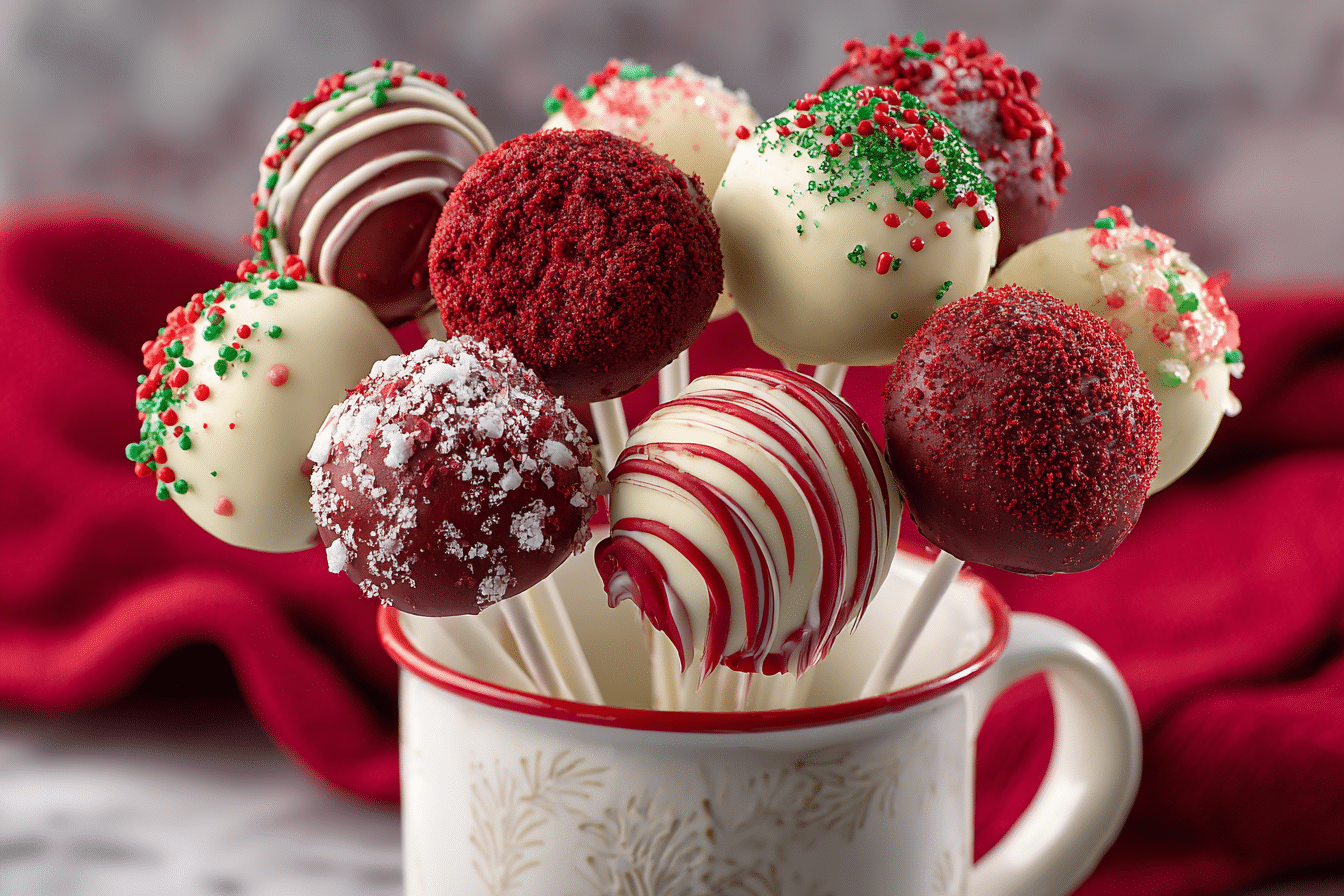
Each pop delivers a dense, truffle-like interior wrapped in a smooth white chocolate shell. They’re indulgent yet easy to serve, and they add instant cheer to any celebration.
Ingredients Overview
For the Cake
-
Red velvet cake – You can use a homemade or boxed red velvet cake for convenience. The cake should be soft, slightly moist, and cooled completely before use.
-
Cocoa powder – Essential for that subtle chocolate depth that sets red velvet apart from plain vanilla.
-
Buttermilk – Adds tang and tenderness to the cake texture. Vegan buttermilk (almond milk + lemon juice) works for dairy-free variations.
-
Vinegar and baking soda – This duo reacts to create a light crumb and helps intensify the red color.
-
Red food coloring – Use gel or liquid dye to achieve that classic red velvet tone. Natural food dyes from beetroot are a great alternative for cleaner ingredients.
For the Frosting
-
Cream cheese frosting – Traditional and slightly tangy, this binds the cake crumbs into a dough. You can use homemade or store-bought. A buttercream alternative also works.
-
Optional flavor add-ins – A dash of vanilla extract or a pinch of salt can deepen the flavor balance.
For the Coating
-
White chocolate or candy melts – These form the smooth, glossy outer shell. Candy melts are more forgiving when melted, but high-quality white chocolate gives better flavor.
-
Coconut oil or shortening (optional) – Helps thin out the chocolate for easier dipping.
Toppings (Optional)
-
Sprinkles
-
Crushed nuts
-
Mini chocolate chips
-
Red velvet cake crumbs for garnish
Step-by-Step Instructions
1. Bake the Red Velvet Cake
Prepare your red velvet cake according to your favorite recipe or box instructions. Once baked, let it cool completely — warm cake will cause frosting to melt and create a sticky mess.
This step can be done a day ahead. The cooled cake should feel soft but not overly crumbly.
2. Crumble the Cake
Use clean hands or a food processor to crumble the cooled cake into fine, even crumbs. Remove any overly crisp or dry edges to ensure a uniform texture.
Transfer the crumbs into a large mixing bowl.
3. Mix in the Frosting
Add a few tablespoons of cream cheese frosting to the crumbs and mix with a spatula or hands until a dough-like consistency forms. You want the mixture to be moist enough to hold its shape but not wet or greasy.
Start with less frosting and add more as needed — usually about ½ to ¾ cup for one 9×13-inch cake.
4. Shape the Cake Balls
Scoop out even portions of dough (about 1 tablespoon each) and roll them into balls using your palms.
Place them on a parchment-lined baking sheet. Chill in the fridge for 1–2 hours or in the freezer for 30 minutes. This helps the balls stay firm during dipping.
5. Insert Sticks
Melt a small amount of white chocolate or candy melts. Dip the tip of a lollipop stick into the chocolate and insert it halfway into a chilled cake ball. This helps anchor the stick and keeps it from slipping out.
Repeat with all cake balls, then return them to the fridge for 10–15 minutes to set.
6. Dip in Chocolate
Melt white chocolate or candy melts in a deep, narrow bowl until smooth. Stir in a bit of coconut oil to thin, if necessary.
Dip each cake pop into the coating, turning gently to cover completely. Let excess drip off, then stand upright in a styrofoam block or cake pop stand to dry.
While still wet, add any toppings like sprinkles or red velvet crumbs.
7. Let Set
Allow the chocolate shell to set completely at room temperature or in the fridge. Once hardened, your cake pops are ready to enjoy or package.
Tips, Variations & Substitutions
-
Use boxed cake: Short on time? A boxed red velvet cake mix works well — just bake, cool, and follow the same crumbling method.
-
Dairy-free option: Use vegan red velvet cake, dairy-free cream cheese frosting, and dairy-free chocolate coating.
-
Add flavor layers: A splash of espresso in the cake enhances the cocoa flavor. Or swirl some raspberry puree into the frosting for a fruity twist.
-
Use different coatings: Dark or milk chocolate pairs well with red velvet, though white chocolate gives the most striking contrast.
-
Mini versions: Use a mini cookie scoop for bite-sized pops, perfect for dessert platters.
Serving Ideas & Occasions
Red velvet cake pops are ideal for:
-
Holiday dessert trays – Especially festive for Valentine’s Day, Christmas, or Fourth of July (add themed sprinkles).
-
Birthday parties – Kid-friendly, mess-free, and easy to hand out.
-
Weddings or showers – Elegant when decorated with gold leaf or drizzles.
-
Gifting – Wrapped in cellophane with ribbon, they make adorable edible gifts.
Serve them with coffee, hot cocoa, or a glass of cold milk for a nostalgic treat.
Nutritional & Health Notes
Cake pops are a treat — sweet, rich, and meant for moderation. Each one offers a small portion of indulgence, usually around 150–200 calories depending on coating and size.
If you’re watching ingredients, opt for:
-
Natural food coloring for a dye-free version.
-
Homemade cake and frosting to reduce artificial ingredients.
-
Vegan alternatives to keep it dairy-free and eggless.
Though not a low-calorie dessert, their small size makes them perfect for satisfying a sweet craving without overdoing it.
FAQs
Q1: How far in advance can I make red velvet cake pops?
A1: You can make them up to 5 days in advance. Store in an airtight container in the fridge. For longer storage, freeze the undecorated cake balls for up to 2 months and dip when ready.
Q2: Why are my cake pops falling off the stick?
A2: This usually happens if the cake mixture is too soft or if the stick wasn’t secured with melted chocolate. Make sure the cake balls are chilled and the stick is dipped in chocolate before inserting.
Q3: Can I make cake pops without cream cheese frosting?
A3: Yes. Any frosting works — buttercream, chocolate ganache, or even a vegan frosting. The key is achieving a moldable texture, not the specific type of frosting.
Q4: What’s the best way to melt candy melts or chocolate?
A4: Use a microwave-safe bowl and heat in 30-second intervals, stirring in between. Add a teaspoon of coconut oil or shortening to thin if needed. Avoid overheating, as chocolate can seize.
Q5: How do I keep cake pops from cracking?
A5: Cracks occur when cold cake pops are dipped in hot melted chocolate. Let chilled pops sit at room temp for 5–10 minutes before dipping to reduce temperature shock.
Q6: Can I decorate cake pops with fondant?
A6: While possible, fondant doesn’t stick well to chocolate coating unless moistened. Instead, use sprinkles, drizzled chocolate, or edible glitter for easy decorating.
Q7: Are cake pops safe to leave at room temperature?
A7: Once the chocolate shell is set, they’re fine at room temperature for up to a day. For longer freshness, especially with cream cheese frosting, store them in the fridge.
PrintChristmas Red Velvet Cake Pops (Mini Sweet Treats)

Moist red velvet cake blended with cream cheese frosting, shaped into balls, and coated in white chocolate for a fun and festive bite-sized treat.
- Prep Time: 30 minutes
- Cook Time: 30 minutes
- Total Time: 2 hours (including chilling)
- Yield: 24 cake pops 1x
Ingredients
Cake:
-
1 box red velvet cake mix (or homemade red velvet cake)
-
Ingredients as per box (usually eggs, oil, water)
Frosting:
-
½ to ¾ cup cream cheese frosting (store-bought or homemade)
Coating:
-
12 oz white chocolate or candy melts
-
1–2 tsp coconut oil (optional)
Toppings (optional):
-
Sprinkles, crushed nuts, or cake crumbs
Instructions
-
Bake red velvet cake and let cool completely.
-
Crumble cake into fine crumbs in a large bowl.
-
Mix in cream cheese frosting gradually until dough forms.
-
Roll into 1-inch balls and chill for 1–2 hours.
-
Dip lollipop sticks in melted chocolate and insert into balls.
-
Chill again for 10–15 minutes to set.
-
Dip each pop into melted chocolate, tap off excess, and decorate.
-
Let dry upright until coating is firm.
Notes
Store in fridge up to 5 days or freeze uncoated balls for later. Use gel food coloring for vibrant red, and natural dyes for a cleaner version.