
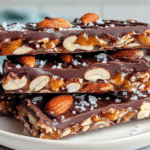
Dark Chocolate Sea Salt Nut Bars are a chewy, crunchy snack bar made with roasted nuts, a smooth dark chocolate layer, and a light sprinkle of flaky sea salt. They strike a balance between nutty depth and gentle sweetness, finished with a subtle salty contrast that keeps each bite interesting.
These bars are baked in a single pan and sliced after cooling, making them a practical homemade snack for busy days, lunch boxes, or a quick bite between meals. The texture combines toasted nuts with a firm chocolate layer that holds everything together without becoming overly hard.
The recipe relies on simple pantry ingredients and a straightforward method, with no special equipment required beyond a baking pan and a mixing bowl. Once set, the bars hold their shape well and can be stored for several days, making them useful for make-ahead snacking.
Ingredients Overview
The foundation of these bars is a mix of raw or lightly roasted nuts. Almonds, cashews, and walnuts are commonly used because they offer a blend of crunch, creaminess, and natural richness. Each nut contributes a different texture, which helps create a layered bite rather than a uniform crunch.
Honey or maple syrup acts as the natural sweetener and binding agent. It coats the nuts lightly and helps them stick together once baked. Honey gives a slightly floral depth, while maple syrup adds a warm, caramel-like tone. Either works well depending on preference.
Dark chocolate forms the top layer and provides a smooth contrast to the crunchy base. A chocolate with around seventy percent cocoa content works well because it melts smoothly but still holds structure when set. It also balances the sweetness from the syrup.
Coconut oil is used in small amounts to help the chocolate melt evenly and set with a clean finish. It also gives the chocolate a slight sheen once cooled.
A pinch of sea salt is essential for finishing the bars. It sharpens the chocolate flavor and brings balance to the sweetness. Flaky sea salt works particularly well because it distributes unevenly, creating small bursts of saltiness.
Vanilla extract can be added to the nut mixture for extra depth. It does not dominate the flavor but adds a soft aromatic note that rounds out the bars.
Ingredients
1 cup raw almonds
1 cup raw cashews
1/2 cup walnuts, chopped
1/3 cup honey or maple syrup
2 tablespoons coconut oil
1 teaspoon vanilla extract
1/2 teaspoon salt
1 cup dark chocolate chips or chopped dark chocolate
1/2 teaspoon flaky sea salt for topping
Step-by-Step Instructions

Start by preheating the oven to 350°F and lining an eight-inch square baking pan with parchment paper. Leave some overhang on the sides to make removing the bars easier later.
In a large bowl, combine the almonds, cashews, and walnuts. Mix them so the pieces are evenly distributed. This ensures each bar has a balanced mix of textures once sliced.
In a small saucepan over low heat, warm the honey or maple syrup with coconut oil. Stir gently until the mixture becomes smooth and fluid. Remove from heat and add vanilla extract and salt, stirring to combine.
Pour the warm mixture over the nuts and stir until every piece is coated. The coating should be light but even, helping the nuts stick together during baking.
Transfer the nut mixture into the prepared baking pan. Press it down firmly using a spatula or the back of a spoon. A compact layer helps the bars hold together after baking.
Bake for about 18–22 minutes, or until the edges turn lightly golden and the mixture becomes fragrant. Keep an eye on the pan toward the end to avoid over-browning.
Remove from the oven and let it cool slightly while preparing the chocolate layer. Melt the dark chocolate with coconut oil in a heatproof bowl over simmering water or in short microwave intervals, stirring until smooth.
Pour the melted chocolate over the warm nut base and spread it evenly with a spatula. Tap the pan lightly on the counter to smooth the surface and remove air bubbles.
Sprinkle flaky sea salt over the chocolate while it is still soft. The salt should be distributed lightly so each slice gets a touch of seasoning.
Place the pan in the refrigerator for at least two hours, or until the chocolate is fully set. Once firm, lift the parchment paper to remove the slab from the pan.
Use a sharp knife to cut into bars or squares. For cleaner edges, warm the knife slightly before slicing and wipe it between cuts.
Tips, Variations & Substitutions
You can change the nut mix depending on preference. Pecans or hazelnuts work well and add a deeper, slightly sweeter flavor. Keeping the total nut quantity consistent helps maintain structure.
For a firmer bar, reduce the honey or maple syrup slightly. For a softer, chewier texture, increase it by a small amount, but avoid adding too much or the bars may not hold shape.
White chocolate or milk chocolate can replace dark chocolate, though the final taste will be sweeter and less intense. Adjust salt slightly if using sweeter chocolate.
Adding seeds such as pumpkin or sunflower seeds can increase crunch and add variety without changing the structure of the bars.
A pinch of cinnamon or espresso powder can be mixed into the nut layer for a deeper flavor profile that pairs well with dark chocolate.
Serving Ideas & Occasions
These bars work well as a quick snack during the day or as a small sweet treat after meals. Their compact shape makes them easy to pack for travel or work.
They also fit well on snack boards alongside dried fruit, fresh berries, or yogurt dips. The combination of chocolate and nuts pairs naturally with coffee or tea.
For gatherings, they can be cut into smaller squares and served as part of a dessert selection. Their layered look makes them visually appealing on a serving tray.
Nutritional & Health Notes
These bars contain a mix of healthy fats from nuts, along with natural sweetness from honey or maple syrup. Nuts provide protein and fiber, which help create a more satisfying snack compared to processed sweets.
Dark chocolate adds antioxidants and a deeper flavor profile. Using moderate portions keeps the bars rich without being overly heavy.
Portion control is important because nuts and chocolate are energy-dense ingredients. Cutting the bars into smaller pieces helps keep servings balanced.
FAQs
Can I use only one type of nut?
Yes, you can use a single type of nut if preferred. Almonds, cashews, or walnuts alone all work well. However, using a mix creates a more varied texture and flavor. If using one type, keep the total measurement the same so the bars hold together properly. Almonds give a firmer crunch, cashews add creaminess, and walnuts bring a slightly earthy note.
Why are my bars falling apart?
This usually happens when the nut mixture is not pressed firmly enough into the pan or when there is not enough binding syrup. Pressing the mixture tightly before baking is important. Also, allow the bars to cool completely before cutting, as the chocolate and syrup need time to set and firm up.
Can I make these without baking?
Yes, a no-bake version is possible. Instead of baking the nut mixture, simply toast the nuts lightly in a pan, mix with warm syrup, and press into the pan. Chill until firm before adding melted chocolate. The texture will be slightly different but still hold together well.
How should I store these bars?
Store the bars in an airtight container in the refrigerator for up to one week. For longer storage, they can be frozen and thawed before serving. Keeping them chilled helps maintain the firmness of the chocolate layer and prevents softening.
Can I reduce the sweetness?
Yes, you can reduce the honey or maple syrup slightly for a less sweet bar. The chocolate layer can also be adjusted by choosing a higher cocoa percentage. Keep in mind that reducing the syrup too much may affect how well the bars hold together.
Can I add dried fruit?
Dried fruit such as cranberries or chopped apricots can be added to the nut mixture. They add a chewy contrast and a mild tartness that pairs well with dark chocolate. Keep additions moderate so the bars remain structurally balanced.
Why does my chocolate layer look dull after setting?
Chocolate can lose its shine if it cools too quickly or if moisture is present during melting. To maintain a smooth finish, melt chocolate gently and avoid overheating. Let the bars set in a cool, dry space or refrigerator without covering the surface directly.
PrintDark Chocolate Sea Salt Nut Bars with Honey & Oats
Dark Chocolate Sea Salt Nut Bars are chewy, crunchy snack bars made with roasted nuts, rich dark chocolate, and a light sprinkle of sea salt. They offer a balanced mix of texture and flavor in every bite.
- Prep Time: 15 minutes
- Cook Time: 20 minutes
- Total Time: 2 hours 35 minutes
- Yield: 12 bars 1x
Ingredients
1 cup almonds
1 cup cashews
1/2 cup walnuts
1/3 cup honey or maple syrup
2 tablespoons coconut oil
1 teaspoon vanilla extract
1/2 teaspoon salt
1 cup dark chocolate
1/2 teaspoon flaky sea salt
Instructions
- Preheat oven to 350°F and line a pan.
- Mix nuts in a bowl.
- Heat syrup with coconut oil and stir until smooth.
- Add vanilla and salt.
- Coat nuts with syrup mixture.
- Press into pan firmly.
- Bake 18–22 minutes.
- Melt chocolate with coconut oil.
- Spread over baked base.
- Add sea salt on top.
- Chill until firm.
- Slice into bars.
Notes
Press mixture firmly for better structure. Chill fully before slicing.