
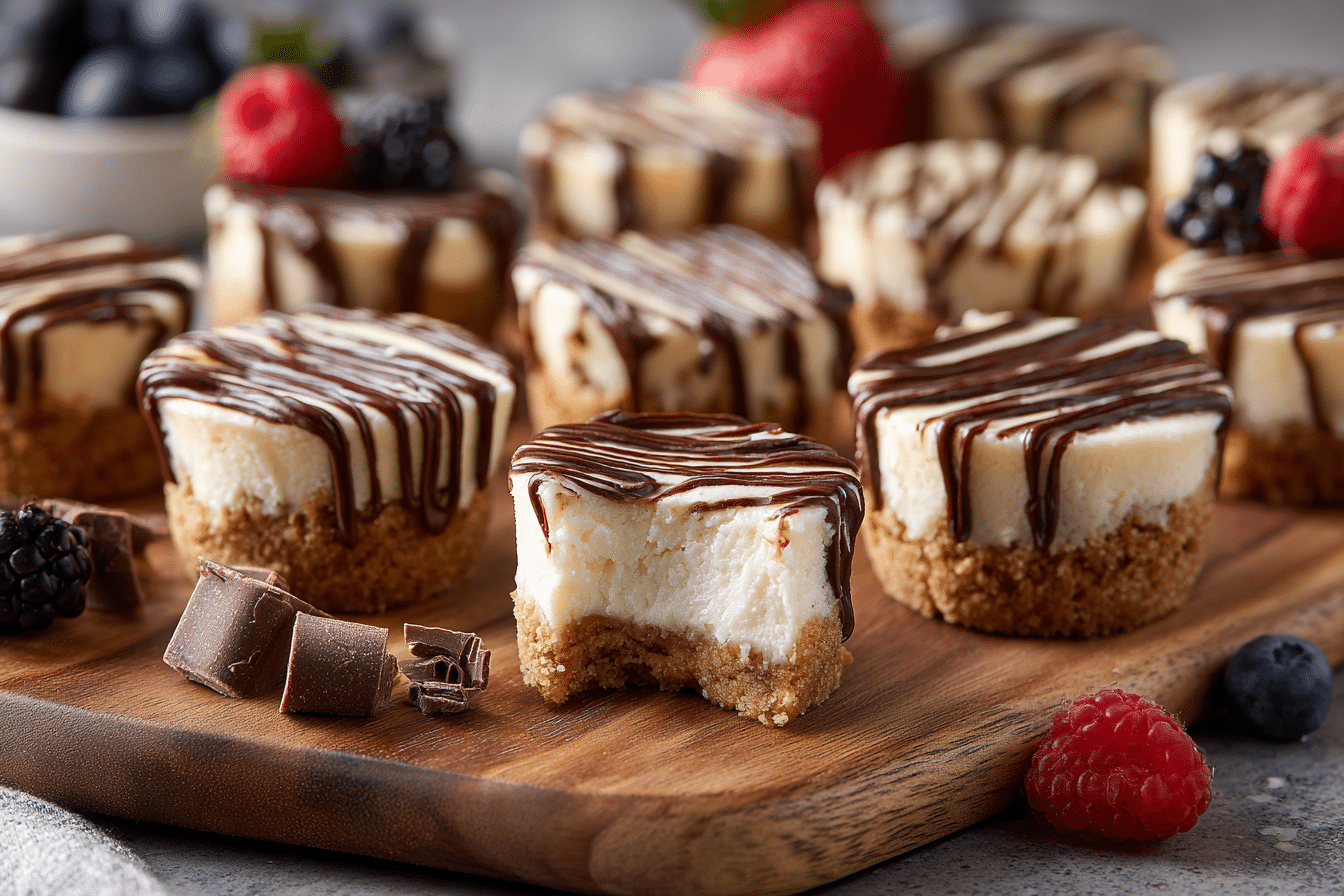
Mini cheesecake bites are the perfect dessert: rich, creamy, and just the right size for satisfying a sweet craving without overindulging. These little treats combine all the flavor of a classic New York-style cheesecake — velvety smooth filling and a buttery graham cracker crust — in a handheld, party-friendly format.
Whether you’re planning a holiday spread, baby shower, or a simple weekend indulgence, these easy mini cheesecake bites are as impressive as they are simple. No water bath, no slicing, no fuss. Just mix, bake, chill, and top however you like.
Their versatility and freezer-friendliness make them a go-to dessert for entertaining and make-ahead baking.
Ingredients Overview
Each component plays a role in creating a creamy texture and balanced sweetness. Here’s what you’ll need and why:
For the Crust:
-
Graham Cracker Crumbs: The classic base — buttery and slightly sweet. Crushed digestive biscuits or vanilla wafers can be used as alternatives.
-
Melted Butter: Binds the crumbs and adds richness.
-
Sugar (Optional): Adds a little extra sweetness and helps the crust firm up.
For the Filling:
-
Cream Cheese: Full-fat, brick-style cream cheese is essential for that smooth, rich texture. Soften it at room temperature for easy blending.
-
Granulated Sugar: Sweetens the filling without overpowering the tang of the cream cheese.
-
Egg: Adds structure and helps the cheesecakes set.
-
Sour Cream: Balances the richness with a slight tang and keeps the filling moist.
-
Vanilla Extract: Rounds out the flavor with warmth and aroma.
-
Lemon Zest (Optional): A subtle brightness that cuts through the richness.
Optional Toppings:
-
Fruit preserves, whipped cream, fresh berries, chocolate ganache, or caramel drizzle — all work beautifully on top of these mini cheesecakes.
Ingredient Substitutions:
-
Dairy-Free: Use vegan cream cheese, coconut cream in place of sour cream, and egg replacers like aquafaba or flax egg.
-
Sugar-Free: Swap granulated sugar with erythritol or monk fruit sweetener for a lower glycemic index option.
-
Gluten-Free: Use gluten-free graham crackers or almond flour for the crust.
Step-by-Step Instructions
This recipe is straightforward and beginner-friendly. No special equipment beyond a muffin tin is required.
-
Preheat Oven & Prep Pan
Preheat your oven to 325°F (163°C). Line a standard muffin tin with paper liners. Silicone molds also work well. -
Make the Crust
In a small bowl, mix 1 cup graham cracker crumbs, 3 tbsp melted butter, and 1 tbsp sugar. Stir until it resembles wet sand. -
Press into Liners
Spoon about 1 tablespoon of crust mixture into each liner. Press down firmly with the back of a spoon or a small glass. Bake for 5 minutes, then remove from the oven and let cool slightly. -
Prepare the Cheesecake Filling
In a large bowl, beat 16 oz (2 blocks) of softened cream cheese with ½ cup granulated sugar until smooth and creamy — about 2 minutes. -
Add Remaining Ingredients
Mix in 1 large egg, ¼ cup sour cream, 1 tsp vanilla extract, and optional lemon zest. Beat until smooth, scraping the sides of the bowl as needed. -
Fill the Muffin Cups
Divide the cheesecake mixture evenly among the crusts — about 2 tablespoons per cup. Smooth the tops with the back of a spoon. -
Bake
Bake at 325°F for 15–18 minutes, or until the centers are set but slightly jiggly. They will firm up as they cool. -
Cool and Chill
Let cool in the pan for 20 minutes, then transfer to the fridge to chill for at least 2 hours, preferably overnight. -
Top & Serve
Once chilled, top with your favorite additions: a dollop of fruit compote, swirl of whipped cream, or a drizzle of chocolate.
Texture Tips:
-
Do not overmix once you add the egg — it can introduce too much air and cause cracking.
-
Use room temperature ingredients for the smoothest filling.
-
Allow to cool fully before chilling to prevent condensation on the tops.
Tips, Variations & Substitutions
-
Swirl In Flavors: Drop a teaspoon of raspberry jam or dulce de leche on top before baking and swirl with a toothpick.
-
Chocolate Version: Add 2 tbsp cocoa powder and a handful of mini chocolate chips to the batter.
-
Pumpkin Twist: Mix in ¼ cup canned pumpkin and pumpkin pie spice for a seasonal option.
-
Nutty Base: Try crushed pecans or almonds in the crust for a crunchier, richer flavor.
-
Freezer-Friendly: Freeze plain cheesecakes (without toppings) in an airtight container for up to 2 months. Thaw in the fridge.
Serving Ideas & Occasions
These cheesecake bites are ideal for:
-
Holiday Dessert Platters – Pair with cookies and truffles for a festive display.
-
Wedding or Baby Showers – Elegant, mess-free, and easy to decorate.
-
Dinner Parties – Serve as a light, decadent finish.
-
Buffet Tables – Stack them on cake stands or tiered trays for visual impact.
-
Everyday Snacking – Just the right size for a sweet treat with coffee or tea.
They’re perfect for portion control — satisfying but not overwhelming.
Nutritional & Health Notes
Each mini cheesecake comes in around 150–180 calories, depending on toppings. Here’s a breakdown:
-
Fat: Comes mostly from cream cheese and crust; consider using low-fat cream cheese to reduce.
-
Protein: Roughly 3–4 grams per bite.
-
Sugar: About 9–12g, depending on added toppings.
-
Portion Control: Their size helps naturally moderate intake.
To make them a bit lighter:
-
Use low-fat dairy options.
-
Skip or go light on toppings.
-
Sweeten with monk fruit or stevia.
FAQs
Q1: Can I make these mini cheesecakes ahead of time?
A: Yes! In fact, they’re even better after chilling overnight. You can make them up to 3 days in advance or freeze for longer storage.
Q2: How do I prevent the tops from cracking?
A: Avoid overbeating the batter after adding the egg. Let them cool gradually, and don’t overbake — slight jiggle in the center is perfect.
Q3: Do I need a water bath for mini cheesecakes?
A: Not at all. Their small size allows them to bake evenly without cracking or drying out — no water bath required.
Q4: Can I make these without liners?
A: Yes, but you’ll need to grease the muffin tin thoroughly and possibly use a silicone pan for easy release. Liners are best for clean presentation.
Q5: How long can I store these in the fridge?
A: Store in an airtight container for up to 5 days. Add toppings just before serving to keep them fresh.
Q6: Can I double the recipe?
A: Absolutely. This recipe doubles well — use two muffin tins or bake in batches.
Q7: What’s the best topping for mini cheesecakes?
A: Classic options include cherry pie filling, lemon curd, chocolate ganache, or fresh berries with a touch of powdered sugar.
Simple Mini Cheesecakes for Entertaining at Home
Creamy, smooth, and perfectly portioned, these mini cheesecake bites are an easy, crowd-pleasing dessert with a classic graham cracker crust and rich vanilla filling.
- Prep Time: 15 minutes
- Cook Time: 18 minutes
- Total Time: 2 hours 35 minutes
- Yield: 2 hours 35 minutes 1x
Ingredients
Crust:
-
1 cup graham cracker crumbs
-
3 tbsp melted butter
-
1 tbsp sugar
Filling:
-
16 oz cream cheese, softened
-
½ cup granulated sugar
-
1 large egg
-
¼ cup sour cream
-
1 tsp vanilla extract
-
1 tsp lemon zest (optional)
Optional Toppings:
-
Fruit preserves, whipped cream, chocolate drizzle, berries
Instructions
-
Preheat oven to 325°F. Line a muffin tin with paper liners.
-
Mix crust ingredients and press 1 tbsp into each liner. Bake for 5 minutes.
-
Beat cream cheese and sugar until smooth. Add egg, sour cream, vanilla, and zest.
-
Divide filling over crusts and smooth tops.
-
Bake for 15–18 minutes until centers are set but slightly jiggly.
-
Cool in pan, then chill for at least 2 hours.
-
Top as desired and serve
Notes
-
Room temp ingredients = smoother texture.
-
Chill overnight for best flavor.
-
Freeze plain bites for future desserts.