
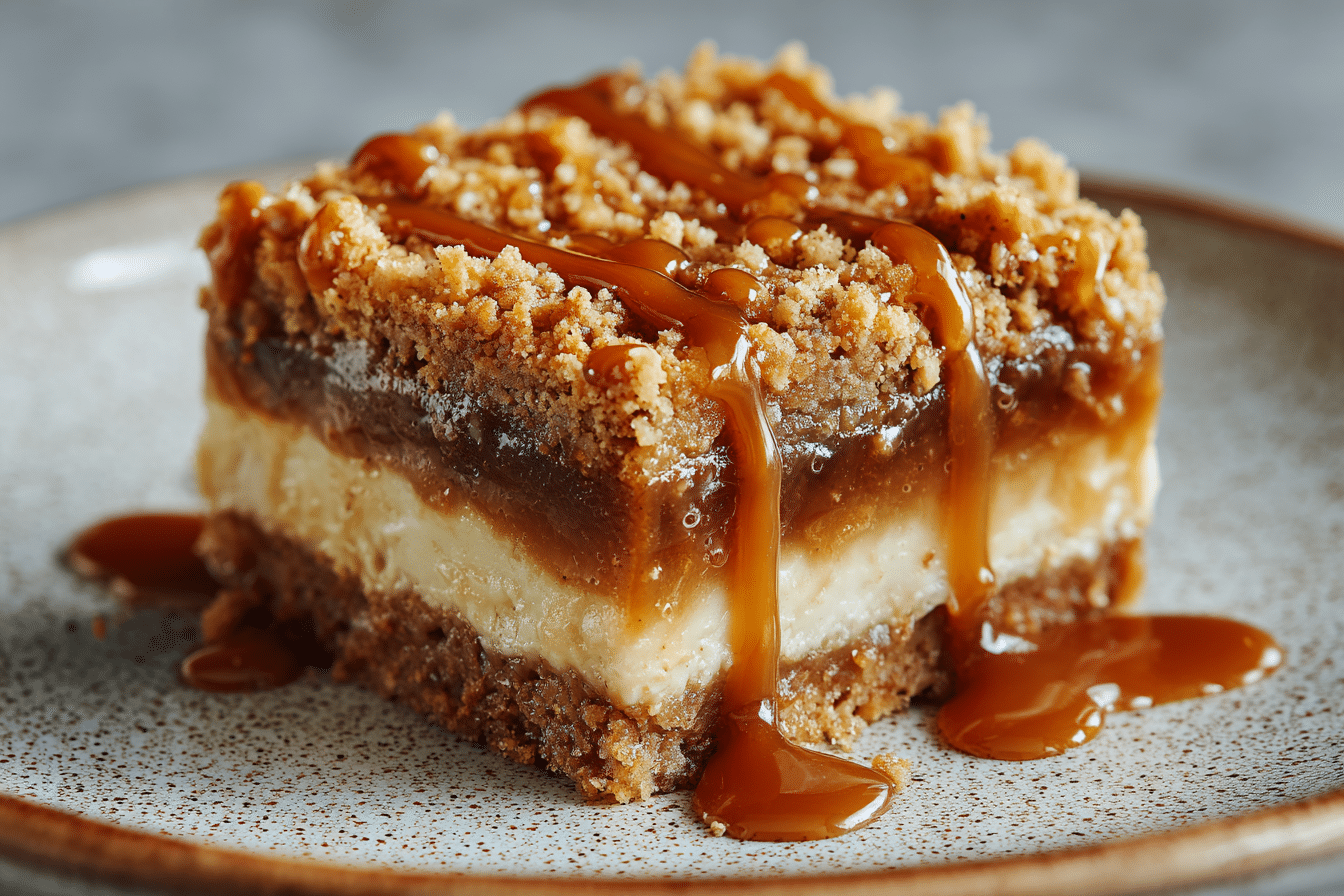
When crisp air and changing leaves call for something cozy, these Salted Caramel Apple Bars are just the thing to bake. With a buttery shortbread crust, spiced apple filling, gooey salted caramel drizzle, and a golden crumble topping, every bite is warm, rich, and layered with fall flavor.
Perfect for potlucks, Thanksgiving dessert tables, weekend baking projects, or after-school snacks, these bars are easier to serve than pie but just as satisfying. They’re the ultimate combination of sweet, salty, and spiced — and they slice beautifully for sharing.
Serve warm with vanilla ice cream, or enjoy chilled with a drizzle of extra caramel. Either way, these apple bars are an autumn must-bake.
Ingredients Overview
Each component of this recipe builds a flavorful, textural masterpiece. Here’s what you’ll need and why it works:
Crust & Crumble (shared base)
-
All-Purpose Flour: Provides structure. You’ll use this in both the crust and crumble.
-
Unsalted Butter: Cold and cubed, it makes the crust tender and rich. Also used in the crumble topping for golden crispness.
-
Brown Sugar: Adds warmth and moisture, plus a slight molasses flavor that pairs beautifully with apples.
-
Cinnamon & Salt: Elevate the crust and balance the sweetness.
-
Rolled Oats (for crumble): Give the topping that classic, rustic texture.
Apple Filling
-
Fresh Apples: Choose tart-sweet apples like Honeycrisp, Pink Lady, or Granny Smith for the best flavor and texture.
-
Cinnamon, Nutmeg, and Clove: Bring cozy warmth and fall spice.
-
Cornstarch: Thickens the apple juices so the bars aren’t soggy.
-
Lemon Juice: Brightens the filling and balances sweetness.
Salted Caramel Sauce
-
Granulated Sugar: Caramelizes into the golden base.
-
Butter & Heavy Cream: Create the silky, luscious texture of the sauce.
-
Salt: A pinch of flaky sea salt takes this caramel from sweet to spectacular.
You can also use high-quality store-bought salted caramel if you’re short on time.
Step-by-Step Instructions
This recipe involves three simple layers and a homemade (or store-bought) caramel. Here’s how to put it all together.
1. Make the Crust
Preheat oven to 175°C (350°F). Line a 9×9-inch square baking pan with parchment paper, leaving an overhang for easy removal.
In a large bowl, combine:
-
2 cups all-purpose flour
-
1/2 cup brown sugar
-
1/2 tsp salt
-
1 tsp cinnamon
-
170g (3/4 cup) cold unsalted butter, cubed
Cut the butter into the flour mixture with a pastry cutter or your fingertips until it resembles coarse crumbs.
Press 2/3 of the mixture into the bottom of the pan to form the crust. Reserve the rest for the crumble topping.
Bake crust for 15 minutes. Remove and set aside.
2. Prepare the Apple Filling
While the crust bakes, peel, core, and thinly slice 3 medium apples.
Toss apples with:
-
1 tbsp lemon juice
-
1/3 cup brown sugar
-
1 tbsp cornstarch
-
1 tsp cinnamon
-
1/4 tsp nutmeg
-
Pinch of ground cloves (optional)
Spread the apple mixture evenly over the warm crust.
3. Make the Caramel Sauce (or use store-bought)
In a saucepan over medium heat, melt:
-
3/4 cup granulated sugar
Stir constantly as it melts and turns amber. Carefully add:
-
60g (1/4 cup) unsalted butter
-
1/2 cup heavy cream
-
1/2 tsp sea salt
Stir until smooth and bubbling. Let cool slightly before drizzling.
Drizzle 1/2 cup caramel sauce evenly over the apples. Reserve the rest for serving.
4. Add Crumble and Bake
Add 1/2 cup rolled oats to the reserved crust mixture to form the crumble topping.
Sprinkle over the apple-caramel layer.
Bake the assembled bars for 35–40 minutes, or until the top is golden and bubbling around the edges.
Let cool completely before slicing (chilling helps them set for clean bars).
5. Slice and Serve
Lift out of the pan using parchment and cut into 12 squares.
Serve warm with ice cream and extra caramel, or enjoy chilled for a firmer bite.
Tips, Variations & Substitutions
-
Short on Time? Use store-bought caramel and pre-sliced apples for quicker prep.
-
Make It Gluten-Free: Use a 1:1 gluten-free flour blend and certified GF oats.
-
Add Nuts: Stir chopped pecans or walnuts into the crumble for extra crunch.
-
More Spiced: Add a pinch of ginger or cardamom to the apple filling.
-
Salt Level: Use more or less sea salt in your caramel depending on preference.
-
Double Batch: Bake in a 9×13-inch pan, increasing quantities by 1.5x for parties or holidays.
Serving Ideas & Occasions
These bars are the ultimate fall treat for:
-
Thanksgiving dessert spreads
-
Apple picking season bakes
-
Weekend baking with kids
-
Holiday brunch tables
-
Afternoon tea or coffee breaks
Serve with:
-
Warm apple cider
-
Chai or spiced tea
-
Vanilla bean ice cream
-
A dollop of whipped cream and extra caramel
Nutritional & Health Notes
While indulgent, these bars can be made with real, whole ingredients and minimal processed components. Apples bring fiber and natural sweetness, and using less sugar in the caramel can reduce the overall sugar content.
To lighten:
-
Use coconut sugar instead of brown sugar
-
Use less caramel or skip the drizzle
-
Swap butter for vegan alternatives or coconut oil
Each bar contains approximately 280–320 calories, depending on caramel and portion size.
FAQs
Q1: Can I use pre-made caramel sauce?
A1: Yes! Store-bought salted caramel sauce works perfectly. Just drizzle it over the apples before baking and again when serving.
Q2: What are the best apples to use?
A2: Choose firm, tart-sweet apples like Honeycrisp, Granny Smith, or Braeburn. They hold their shape and balance the sweetness of the caramel.
Q3: Do these bars need to be refrigerated?
A3: They can be stored at room temperature for 2 days, but refrigerating extends freshness to 4–5 days. They also slice better when chilled.
Q4: Can I freeze salted caramel apple bars?
A4: Yes. Wrap slices tightly and freeze for up to 2 months. Thaw in the fridge or at room temperature before serving.
Q5: Why did my bars turn out too soft?
A5: This could be due to juicy apples or too much caramel. Make sure to bake long enough and let them cool completely to firm up.
Q6: Can I make this dairy-free?
A6: Yes. Use plant-based butter and coconut cream in place of dairy cream for the caramel sauce. Check your caramel and chocolate labels for hidden dairy.
Q7: How do I make the bars crispier?
A7: Bake a few extra minutes to ensure the crumble is golden. Also, let them cool fully before cutting to allow the crust to set.
PrintSalted Caramel Apple Bars – The Best Fall Dessert
Buttery crust, spiced apples, gooey salted caramel, and golden crumble make these Salted Caramel Apple Bars the ultimate fall dessert — cozy, flavorful, and sliceable for any occasion.
- Prep Time: 25 minutes
- Cook Time: 25 minutes
- Total Time: 2 hours
- Yield: 12 bars 1x
Ingredients
Crust & Crumble:
-
2 cups all-purpose flour
-
1/2 cup brown sugar
-
1/2 tsp salt
-
1 tsp cinnamon
-
170g cold unsalted butter, cubed
-
1/2 cup rolled oats (for crumble)
Apple Filling:
-
3 medium apples, peeled and thinly sliced
-
1 tbsp lemon juice
-
1/3 cup brown sugar
-
1 tbsp cornstarch
-
1 tsp cinnamon
-
1/4 tsp nutmeg
-
Pinch cloves (optional)
Salted Caramel Sauce:
-
3/4 cup granulated sugar
-
60g unsalted butter
-
1/2 cup heavy cream
-
1/2 tsp sea salt
Instructions
-
Preheat oven to 175°C (350°F). Line a 9×9-inch pan with parchment.
-
Mix flour, brown sugar, salt, cinnamon, and cold butter until crumbly.
-
Press 2/3 into pan for crust. Bake 15 minutes. Reserve the rest.
-
Toss sliced apples with lemon juice, sugar, cornstarch, and spices.
-
Prepare caramel: Melt sugar until golden. Stir in butter, cream, and salt. Cool slightly.
-
Layer apples on crust, drizzle with 1/2 cup caramel, top with crumble (add oats).
-
Bake 35–40 minutes until golden and bubbly.
-
Cool completely, then slice and serve with extra caramel if desired.
Notes
-
Chill before slicing for clean bars.
-
Use gluten-free flour and oats if needed.
-
Store up to 5 days in the fridge or freeze for later.