
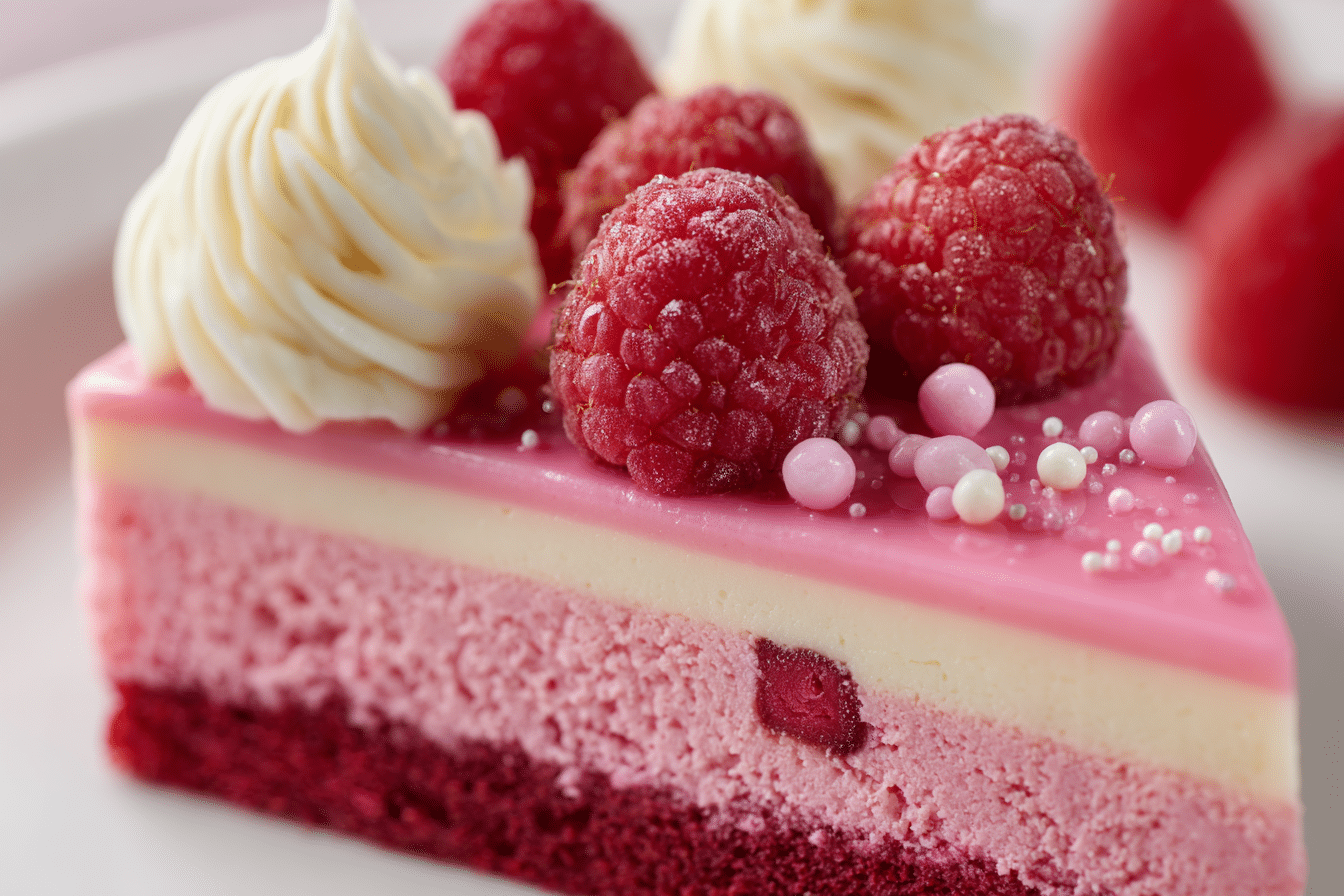
If you’re looking for a dessert that feels like a romantic occasion in itself, this Pink Velvet Raspberry Cheesecake is just the showstopper you need. With its silky raspberry-speckled filling, buttery cookie crust, and naturally blushed hue, it’s a true celebration of elegance and indulgence — ideal for Valentine’s Day, birthdays, bridal showers, or any day that deserves a little extra sweetness.
This cheesecake combines the tender, smooth richness of traditional velvet-style cakes with the tangy brightness of fresh raspberries. The result? A balanced bite that’s rich but never heavy, sweet with a tart edge, and stunning in appearance.
Unlike more common cheesecake flavors, pink velvet brings a subtle cocoa warmth beneath the fruity layers, while the raspberries offer bursts of fresh juiciness. It’s a dessert that feels classic yet new — and once you try it, it’s hard not to crave again.
Ingredients Overview
Every element of this cheesecake is thoughtfully chosen for flavor, texture, and color. Here’s a closer look at what makes each component shine:
For the Crust
-
Graham crackers or vanilla wafers: Crushed and mixed with butter, this forms the crispy, buttery base. For deeper flavor, try chocolate wafer cookies.
-
Unsalted butter: Helps bind the crumbs and gives the crust a golden finish once baked.
-
Pinch of salt: Balances the sweetness and brings out the richness.
For the Pink Velvet Filling
-
Cream cheese (full-fat): Always use brick-style cream cheese for structure and creaminess. Let it soften at room temperature to avoid lumps.
-
Granulated sugar: Sweetens without overpowering. You could use superfine sugar for easier blending.
-
Sour cream: Adds a slight tang and extra creaminess to the filling.
-
Eggs: Bind the batter and help it bake into a firm yet tender custard-like texture.
-
White chocolate (melted): A luxurious touch that adds richness and subtle depth.
-
Fresh raspberries (or thawed frozen): These get pureed into the batter, delivering natural color and a hint of tartness. Strain out the seeds for smoothness.
-
Cocoa powder: Just a tablespoon for a gentle chocolate undertone — it’s the “velvet” part of pink velvet.
-
Vanilla extract: Adds warm sweetness and enhances the raspberry flavor.
-
A drop of pink food coloring (optional): To boost the blush tone, especially if your berries are pale.
Topping (Optional but Beautiful)
-
Whipped cream: Pipe or dollop for an airy contrast.
-
Fresh raspberries: Garnish to hint at the flavor inside.
-
White chocolate shavings: For extra elegance.
Substitutions & Tips:
-
Make it gluten-free by using gluten-free graham crackers or almond flour crust.
-
Swap sour cream for Greek yogurt if preferred.
-
Dairy-free? Use plant-based cream cheese and coconut cream, but note it may be softer in texture.
Step-by-Step Instructions
Step 1: Prepare the Crust
-
Preheat your oven to 325°F (163°C).
-
Pulse your cookies in a food processor until fine crumbs form.
-
Mix with melted butter and a pinch of salt, then press into the bottom of a springform pan lined with parchment.
-
Bake for 10 minutes, then set aside to cool.
Tip: Press the crust firmly using the bottom of a glass for an even, compact layer. This prevents crumbling when slicing.
Step 2: Blend the Raspberry Mixture
-
In a blender or food processor, puree raspberries until smooth.
-
Strain through a fine mesh sieve to remove seeds.
-
Set aside ½ cup of the smooth raspberry puree for the filling.
Step 3: Make the Cheesecake Filling
-
In a stand mixer, beat the softened cream cheese on medium until completely smooth.
-
Gradually add sugar and continue beating for 2–3 minutes until fluffy.
-
Mix in sour cream, melted white chocolate, vanilla, and cocoa powder.
-
Add eggs one at a time, mixing just until incorporated (don’t overbeat).
-
Stir in the raspberry puree and food coloring (if using) until you reach your desired blush hue.
Chef’s Note: Always scrape down the sides of the bowl for even blending. Overmixing once eggs are added can introduce air and cause cracking.
Step 4: Bake with Care
-
Pour the filling over the cooled crust.
-
Place the springform pan in a larger roasting pan and fill with 1–2 inches of hot water (a water bath helps prevent cracks).
-
Bake for 60–70 minutes. The center should jiggle slightly when gently shaken.
-
Turn off the oven, crack the door, and let the cheesecake cool inside for 1 hour.
Step 5: Chill & Decorate
-
Remove from oven and let cool completely at room temperature.
-
Refrigerate for at least 6 hours or overnight.
-
Once chilled, remove from pan, pipe whipped cream around the edge, and decorate with raspberries and white chocolate.
Tips, Variations & Substitutions
Expert Tips:
-
Always use room temperature ingredients for a smooth filling.
-
A water bath is worth the effort — it keeps the texture creamy and the top smooth.
-
Let the cheesecake set overnight for the cleanest slices.
Variations:
-
Chocolate Raspberry Swirl: Add raspberry puree in swirls to a vanilla cheesecake base.
-
Mini Cheesecakes: Use a muffin tin for individual portions — ideal for parties.
-
No-Bake Version: Use a no-bake cheesecake filling with gelatin and skip the oven.
Dietary Substitutions:
-
Vegan: Use dairy-free cream cheese, coconut cream, and a flax egg alternative.
-
Low-carb: Swap sugar for erythritol and use an almond flour crust.
-
Nut-free: Stick to graham crackers instead of almond or other nut-based crusts.
Serving Ideas & Occasions
This cheesecake is perfect for occasions that call for something visually striking and deeply satisfying. Its pink hue and creamy center make it ideal for:
-
Valentine’s Day or Anniversaries — romantic and elegant.
-
Bridal or Baby Showers — delicate and festive.
-
Spring and Summer Parties — thanks to the berry freshness.
-
Holiday Dessert Tables — a colorful twist among classics.
Serve chilled with a sparkling rosé, vanilla bean coffee, or even a berry coulis drizzle for extra flair.
Nutritional & Health Notes
A typical slice of this cheesecake provides a satisfying mix of protein, healthy fats, and natural fruit sugars. Using fresh raspberries adds vitamin C and antioxidants, while the cream cheese and sour cream offer richness and calcium.
To make it lighter, reduce the sugar slightly and use Greek yogurt instead of sour cream. Portion control is key — this is a decadent treat meant to be enjoyed mindfully.
For a balanced meal, serve after a lean protein entrée and light salad.
FAQs
Q1: Can I use frozen raspberries for this cheesecake?
A1: Yes, frozen raspberries work well. Just thaw them completely and strain out the excess juice before blending. Always strain the puree to remove seeds for the smoothest texture.
Q2: How do I prevent cracks in my cheesecake?
A2: Use room temperature ingredients, avoid overmixing the batter, and bake the cheesecake in a water bath. Let it cool gradually inside the oven to prevent sudden temperature shifts that cause cracks.
Q3: Can I make this cheesecake ahead of time?
A3: Absolutely. This cheesecake can be made 1–2 days in advance. In fact, it tastes better after chilling overnight, allowing the flavors to meld and the texture to firm up.
Q4: Is pink food coloring necessary?
A4: Not at all! The raspberries naturally tint the filling a lovely blush pink. However, if your berries are pale, a drop or two of food coloring can enhance the hue for presentation.
Q5: How should I store leftovers?
A5: Store the cheesecake tightly covered in the refrigerator for up to 5 days. For longer storage, freeze individual slices wrapped in plastic and foil for up to 1 month.
Q6: Can I make this recipe without a water bath?
A6: You can, but the texture may not be as silky, and the top might crack. If skipping the water bath, place a pan of hot water on the lower oven rack to create steam.
Q7: What kind of pan should I use?
A7: A 9-inch springform pan is ideal. It allows for easy removal and neat slices. Always line the bottom with parchment and grease the sides lightly for best results.
Image showcases a close-up view of a bowl filled with golden, bite-sized churro bites, each one perfectly crisped in the air fryer. The churro bites are coated in a fine dusting of cinnamon and sugar, giving them a subtly textured, glistening appearance. Their slightly irregular, pillow-like shapes add to their homemade charm. A small dish of chocolate dipping sauce is partially visible in the background, offering a rich contrast to the light and airy texture of the churros. The overall composition emphasizes a balance of indulgence and wholesomeness, highlighting the healthier preparation without sacrificing classic churro appeal.
A creamy, blushed cheesecake infused with raspberries and white chocolate, set atop a buttery cookie crust — perfect for special occasions and berry lovers alike.
- Prep Time: 25 minutes
- Cook Time: 70 minutes
- Total Time: 8 hours (including chilling)
- Yield: 12 slices 1x
Ingredients
Crust:
-
1 ½ cups graham cracker or vanilla wafer crumbs
-
5 tbsp unsalted butter, melted
-
Pinch of salt
Filling:
-
24 oz cream cheese, softened
-
1 cup granulated sugar
-
1 cup sour cream
-
3 large eggs
-
½ cup raspberry puree (strained)
-
4 oz white chocolate, melted
-
1 tsp vanilla extract
-
1 tbsp unsweetened cocoa powder
-
Optional: 1–2 drops pink food coloring
Topping (optional):
-
Whipped cream
-
Fresh raspberries
-
White chocolate shavings
Instructions
-
Preheat oven to 325°F (163°C). Prepare a 9-inch springform pan with parchment paper.
-
Mix crumbs, butter, and salt. Press into pan bottom. Bake 10 minutes. Cool.
-
Puree raspberries and strain. Set aside ½ cup.
-
Beat cream cheese until smooth. Add sugar and beat 2 minutes.
-
Mix in sour cream, melted chocolate, vanilla, cocoa, and raspberry puree. Add eggs one at a time.
-
Pour into crust. Place pan in water bath.
-
Bake 60–70 minutes until center slightly jiggles.
-
Cool in oven 1 hour. Then chill 6 hours or overnight.
-
Decorate with whipped cream, raspberries, and white chocolate before serving.
Notes
For a brighter pink, add food coloring. Store in the fridge for up to 5 days or freeze for up to a month. Use a water bath for a smooth top.