
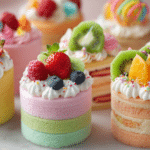
Bento cakes, also known as lunchbox cakes, have taken over social media with their petite size and irresistible charm. Originally popularized in Korea, these 4 to 6-inch cakes are perfect for gifting, celebrating small moments, or simply indulging without the commitment of a full-sized dessert. If you’ve ever wanted to know how to make adorable bento cakes at home, you’re in the right place.
These mini cakes are light, fluffy, and customizable in endless ways. Their charm lies not just in the taste but also in the decoration—whether it’s a simple swirl of pastel buttercream or a hand-piped message. Despite their small stature, they deliver big flavor and joy. Ideal for birthdays, anniversaries, or a “just because” moment, bento cakes are the new go-to treat for minimal effort and maximum cuteness.
Ingredients Overview
Making adorable bento cakes begins with a soft sponge base and a creamy frosting. Here’s a breakdown of the essentials:
-
Cake Flour: Provides a tender, delicate crumb. If you don’t have cake flour, you can substitute with all-purpose flour mixed with cornstarch (for every cup, use 3/4 cup all-purpose flour + 2 tbsp cornstarch).
-
Eggs: Whipped to incorporate air, giving the cake its lift and structure.
-
Sugar: White granulated sugar keeps the flavor light and neutral, perfect for layering with different fillings.
-
Milk: Whole milk adds moisture and richness to the sponge.
-
Butter or Oil: Butter adds flavor, while oil keeps the cake ultra-moist. Use one or the other depending on your texture preference.
-
Vanilla Extract: For a warm, classic base flavor. You can also try almond or lemon extract for a twist.
-
Baking Powder: Ensures the cakes rise evenly and maintain a fluffy texture.
-
Salt: Balances sweetness and enhances the overall flavor.
Frosting & Filling Options:
-
Buttercream: A classic choice—pipeable, flavorful, and easy to color. Use American or Swiss meringue buttercream depending on your taste and skill level.
-
Whipped Cream: Light and airy, perfect for a more delicate feel.
-
Ganache: Great for a rich, glossy finish.
-
Fruit Jams, Nut Spreads, or Custard: Layered in between the cakes for added flavor and moisture.
Step-by-Step Instructions

-
Make the Sponge Cake
Preheat your oven to 325°F (165°C). Prepare a quarter sheet pan or large baking tray lined with parchment paper.
In a large bowl, beat 3 large eggs and 2/3 cup sugar until pale and fluffy (about 5 minutes). In a separate bowl, whisk together 1 cup cake flour, 1 tsp baking powder, and 1/4 tsp salt.
Sift dry ingredients into the egg mixture and gently fold. Add 1/4 cup warm milk mixed with 2 tbsp melted butter or oil and 1 tsp vanilla. Fold until just combined.
Pour batter into the prepared pan and bake for 15–18 minutes or until the top springs back and a toothpick comes out clean. Let cool completely. -
Cut and Stack the Cakes
Using a 4 to 6-inch round cutter or bowl, cut out small cake circles from the sponge sheet. You should get about 6 circles for 3 mini cakes with 2 layers each.
Optional: Level each layer with a serrated knife for a flat surface. -
Prepare Frosting
Make your buttercream or whipped frosting of choice. For buttercream, beat 1 cup unsalted butter until creamy, add 3–4 cups powdered sugar gradually, and beat until fluffy. Add 1–2 tbsp milk and 1 tsp vanilla extract to reach your desired consistency. -
Assemble the Cakes
Place one cake circle on a cake board or parchment square. Pipe or spread a layer of frosting or filling. Add the second layer and frost the top and sides. Smooth using an offset spatula or bench scraper.
Chill the assembled cakes for 10–15 minutes before final decorating. -
Decorate Creatively
Use piping tips to create borders, flowers, or messages. Soft pastel colors, sprinkles, edible pearls, or chocolate drizzle all work beautifully on bento cakes.
Place each cake in a clamshell takeout box with a parchment base for the full bento cake presentation.
Tips, Variations & Substitutions
-
Use Different Flavors: Add matcha powder, cocoa, or fruit puree to the sponge for variety.
-
Frosting Flavor Twists: Mix in freeze-dried fruit powder, espresso, or citrus zest into your buttercream for subtle but unique profiles.
-
Color Tips: Gel food coloring gives vivid color without watering down your frosting. Pastels are especially popular.
-
Dietary Swaps: Use plant-based milk and egg substitutes like aquafaba or flax eggs to make vegan versions.
-
Tool Hacks: If you don’t have a round cutter, trace a small bowl and cut with a knife.
Serving Ideas & Occasions
Bento cakes are perfect for birthdays, anniversaries, or sending sweet messages to friends. Their personal size makes them easy to portion and gift.
Serve these cakes chilled or at room temperature, depending on your frosting. Pair them with hot tea, coffee, or sparkling water for a light treat.
They’re also great party favors. Custom-design each one with the recipient’s name or a cute icon. They’re also ideal for bake sales or as picnic desserts.
Nutritional & Health Notes
Bento cakes are lower in calories compared to full-size cakes due to their portion size, usually around 300–400 calories per mini cake depending on the ingredients.
Using oil instead of butter can reduce saturated fat. Substituting part of the sugar with fruit puree or honey is an option, though it may change the texture slightly.
Choosing whipped cream or low-sugar fillings can lighten the overall dessert. The smaller size makes it easier to enjoy a sweet treat without overindulging.
FAQs
How big is a bento cake?
Bento cakes are typically 4 to 6 inches in diameter and serve one to two people. Their petite size is perfect for individual portions or gifting.
Can I make bento cakes ahead of time?
Yes, you can bake the sponge and prepare the frosting 1–2 days in advance. Store the unfrosted cakes tightly wrapped and refrigerate frosting separately. Assemble the day of serving.
What box do I use for packaging?
Use 6×6-inch clamshell boxes or kraft lunch boxes lined with parchment paper. You can also add a mini fork or spoon for easy serving.
How do I get smooth frosting on such a small cake?
Use an offset spatula and a bench scraper. Chill the cake briefly between crumb coating and final decorating to help firm it up and get a smoother surface.
What flavors work best for bento cakes?
Classic vanilla, chocolate, and strawberry are most popular, but flavors like matcha, lemon, red velvet, or Earl Grey are also delightful.
Can I make these without a stand mixer?
Yes, a hand mixer works perfectly fine. The only difference is it might take a bit longer to whip the eggs or cream the butter, but the results will still be great.
How do I color the frosting safely?
Use gel food coloring, which is more concentrated and won’t water down the frosting. Always start with a tiny amount and build up for pastel or vivid hues.
Mini Bento Cakes Tutorial for Cute Party Desserts
Adorable, personalized mini cakes perfect for gifting, parties, or a sweet solo treat. Light sponge layers with creamy frosting and customizable decorations.
- Prep Time: 25 minutes
- Cook Time: 18 minutes
- Total Time: 45 minutes
- Yield: 3 mini cakes (4–6 inch)
Ingredients
For the Cake:
3 large eggs
2/3 cup granulated sugar
1 cup cake flour
1 tsp baking powder
1/4 tsp salt
1/4 cup milk (warmed)
2 tbsp melted butter or oil
1 tsp vanilla extract
For the Buttercream:
1 cup unsalted butter
3–4 cups powdered sugar
1–2 tbsp milk
1 tsp vanilla extract
Optional Fillings:
Fruit jam
Nutella
Whipped cream
Instructions
-
Preheat oven to 325°F (165°C) and line a quarter sheet pan with parchment.
-
Beat eggs and sugar until pale and fluffy (about 5 minutes).
-
Sift in flour, baking powder, and salt. Gently fold to combine.
-
Add warm milk, melted butter/oil, and vanilla. Fold gently.
-
Pour into the pan and bake for 15–18 minutes. Cool completely.
-
Cut 4 to 6-inch circles using a cutter or bowl.
-
Make buttercream by beating butter until creamy, then adding sugar, milk, and vanilla.
-
Assemble cakes with frosting or filling between layers.
-
Frost the top and sides. Chill before decorating.
-
Decorate as desired and place in lunchbox containers for serving.
Notes
Use gel coloring for vivid or pastel tones. Store chilled for up to 2 days. Can be made vegan with plant-based alternatives.