
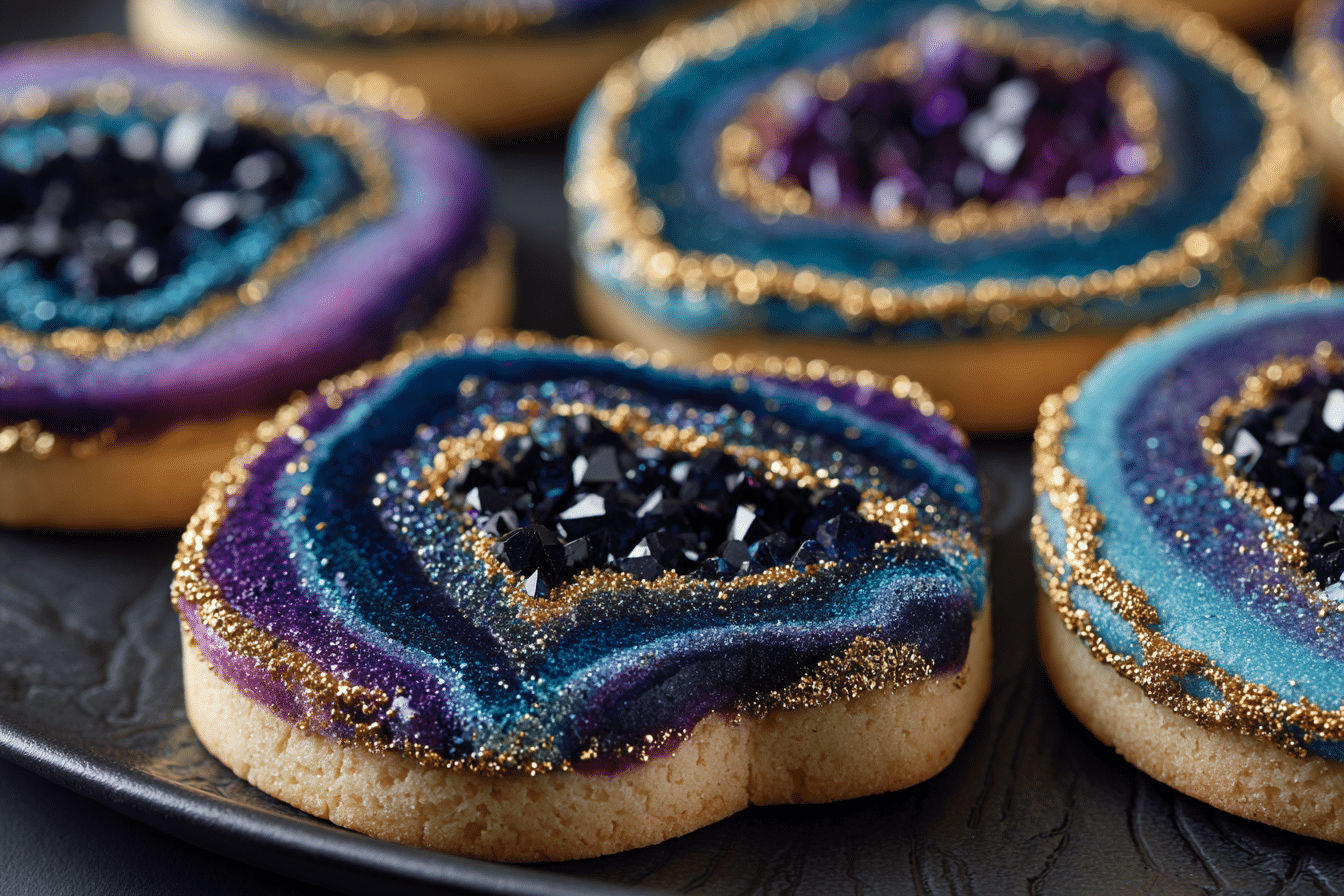
Stunning Geode Cookies that sparkle and shine are more than just a dessert—they’re edible art. Inspired by the natural beauty of crystal geodes, these cookies feature shimmering sugar “crystals” nestled in the center of buttery sugar cookie rounds. With their vibrant colors, glittering finish, and glassy texture, they’re guaranteed to impress at parties, weddings, and special events.
These cookies look intricate but are surprisingly simple to make with a few pantry staples and a touch of edible magic. The base is a classic vanilla sugar cookie—crisp on the edges and tender inside—cut into rounds or gemstone shapes. The centers are hollowed out and filled with crushed candy, which melts during baking to create the sparkling geode effect.
Whether you tint your sugar crystals with vivid jewel tones or go for soft pastel hues, these cookies add drama and beauty to any dessert table. They’re fun to bake, even more fun to decorate, and the final result is a dazzling treat that tastes as good as it looks.
Ingredients Overview
Each component of these geode cookies plays a role in flavor, structure, or aesthetic sparkle.
All-Purpose Flour:
The base of the cookie dough. Provides structure and holds the shape of the cookie during baking. Chilling the dough helps prevent spreading.
Unsalted Butter:
Creamed with sugar to create a tender, flavorful dough. Butter also gives the cookies their golden edges and rich vanilla flavor.
Granulated Sugar:
Sweetens the dough and helps with structure. Essential for a smooth sugar cookie finish that contrasts beautifully with the crystal centers.
Egg:
Adds richness and helps bind the dough. A single egg is perfect for a stable, rollable cookie dough.
Vanilla Extract:
Adds depth and warmth to the flavor. You can also use almond or lemon extract for a twist.
Salt:
Balances the sweetness and enhances the overall flavor.
Baking Powder:
Adds just a touch of lift so the cookies aren’t too flat, but still keep a crisp edge.
Hard Candy (Like Jolly Ranchers or Clear Mints):
Crushed and added to the center of each cookie, these melt during baking to form the glossy, crystal-like centers. Choose colors based on your desired geode look—amethyst, turquoise, rose quartz, etc.
Colored Sugar or Edible Glitter (Optional):
Used for decorating around the candy center after baking. Adds dimension, sparkle, and texture to the geode “crystals.”
Gel Food Coloring (Optional):
For tinting crushed candy or decorating edges with painted designs.
Corn Syrup or Water + Sugar (For Decorating):
Used to help edible glitter or sugar adhere around the edges of the “geode.”
Step-by-Step Instructions
1. Make the Sugar Cookie Dough
In a large bowl, cream 3/4 cup unsalted butter with 3/4 cup granulated sugar until light and fluffy (about 2 minutes). Add 1 egg and 1 tsp vanilla extract and mix until combined.
In a separate bowl, whisk together 2 1/4 cups all-purpose flour, 1/2 tsp baking powder, and 1/4 tsp salt. Gradually add dry ingredients to the wet mixture, mixing until a soft dough forms.
2. Chill the Dough
Divide dough into two disks, wrap in plastic wrap, and chill for at least 1 hour. This helps the cookies hold their shape and makes rolling easier.
3. Preheat Oven and Prepare Baking Sheets
Preheat oven to 350°F (175°C). Line baking sheets with parchment paper or silicone mats.
4. Roll and Cut Shapes
On a lightly floured surface, roll dough to 1/4-inch thickness. Use cookie cutters to cut out large rounds or gemstone shapes. Use a small round cutter or knife to create a center “window” in each cookie where the candy will go.
Transfer cookies to the prepared baking sheets.
5. Fill Centers with Crushed Candy
Unwrap and sort hard candies by color. Place each color in a zip-top bag and crush with a rolling pin or mallet into small crystals.
Spoon the crushed candy into the center of each cookie, filling the cut-out shape just below the surface level of the cookie to prevent overflow.
6. Bake
Bake for 9–11 minutes, or until the cookie edges are set and lightly golden, and the candy has fully melted. Let cool on the baking sheet completely so the centers can harden.
7. Decorate the Geodes (Optional)
Once cooled, use a small brush to apply corn syrup or edible glue around the candy centers. Sprinkle with colored sugar, edible glitter, or painted details using food coloring diluted with clear alcohol (like vodka or lemon extract).
You can layer different colors of sugar for a geode effect—start with dark crystals at the center and lighten toward the edges.
8. Store and Serve
Store cookies in an airtight container at room temperature for up to 1 week. Keep them flat and separated by parchment paper to protect the delicate centers.
Tips, Variations & Substitutions
Tips for Best Results:
-
Chill the dough before cutting to help the cookies keep their shape.
-
Don’t overfill the centers with crushed candy—too much can cause bubbling or overflow.
-
Allow cookies to cool completely on the baking sheet so the candy centers set firm.
-
For sharp geode lines, use a small offset spatula or knife to define candy edges after cooling.
Design Variations:
-
Mini Geodes: Use smaller cutters to make mini versions for favors or edible décor.
-
Layered Colors: Mix two colors of crushed candy in the center for a natural ombré look.
-
Metallic Touch: Paint edges with edible gold or silver dust for a luxe finish.
-
Marbled Centers: Lightly swirl two colors of melted candy with a toothpick before they set.
Substitutions:
-
No Jolly Ranchers? Use any clear, hard candy (like Life Savers or mints). Avoid gummy or opaque varieties.
-
No Edible Glitter? Use colored sanding sugar or skip for a more natural, crystal-like look.
-
Flavored Candy: Mix fruit flavors to add a subtle fruity note to your cookies.
Serving Ideas & Occasions
These sparkling geode cookies are perfect showstoppers for:
-
Birthday parties (especially gem or crystal-themed)
-
Weddings, bridal showers, or baby showers
-
Holiday cookie platters
-
Graduation gifts or place settings
-
DIY party favors (wrapped individually in cellophane)
-
Edible décor for cakes and dessert tables
They pair beautifully with herbal teas, sparkling lemonade, or light white wines for elegant entertaining. Kids and adults alike will be wowed by their visual impact and sweet, crunchy centers.
Nutritional & Health Notes
Geode cookies are a treat meant for special occasions—high in sugar and designed for visual impact and enjoyment. Each cookie offers a combination of sweet, buttery dough and a hard candy center, making them more dessert than snack.
You can reduce sweetness slightly by making the cookies thinner or using less candy in the centers. For a slightly more wholesome version, use natural food coloring and organic candies, but the primary joy of these cookies lies in their fun, festive appearance.
FAQs
1. Can I make the dough ahead of time?
Yes. The sugar cookie dough can be made up to 3 days in advance and stored in the fridge wrapped tightly in plastic. You can also freeze it for up to 1 month.
2. How do I crush the candy without making a mess?
Place candies in a zip-top freezer bag and crush with a rolling pin or meat mallet. Use double bags to prevent splitting. You want small chunks, not fine powder.
3. Will the candy centers stay hard?
Yes, once fully cooled, the candy hardens like stained glass. Be sure to cool completely on the baking sheet before handling.
4. Can I use other cookie doughs for the base?
Yes, but choose one that holds its shape well, like shortbread or gingerbread. Avoid doughs that spread too much, which may distort the geode centers.
5. Can I make these gluten-free?
Absolutely. Use a gluten-free all-purpose flour blend in your sugar cookie recipe. Make sure your hard candies are gluten-free as well.
6. Why did my candy bubble or get cloudy?
This can happen if the oven temperature is too high or the candy is overheated. Stick to 350°F and don’t overbake. Also, avoid overfilling the centers.
7. How do I store them without breaking the centers?
Lay cookies flat in a single layer or stack between sheets of parchment paper in an airtight container. Keep away from humidity to avoid stickiness.
Magical Geode Cookies with Crystal Candy Centers
These Stunning Geode Cookies feature buttery sugar cookie bases with sparkling, candy-filled centers that mimic real gemstones. A show-stopping treat for parties and gifts.
- Prep Time: 30 minutes
- Cook Time: 10 minutes
- Total Time: 40 minutes
- Yield: 12 cookies 1x
Ingredients
2 1/4 cups all-purpose flour
3/4 cup unsalted butter, softened
3/4 cup granulated sugar
1 large egg
1 tsp vanilla extract
1/2 tsp baking powder
1/4 tsp salt
Hard candies (like Jolly Ranchers), crushed
Optional: colored sugar, edible glitter, gel food coloring, corn syrup
Instructions
-
Cream butter and sugar. Add egg and vanilla; mix until smooth.
-
In another bowl, mix flour, baking powder, and salt. Gradually add to wet ingredients.
-
Divide dough, wrap, and chill for 1 hour.
-
Preheat oven to 350°F. Line baking sheets with parchment.
-
Roll dough to 1/4 inch thick. Cut into shapes and hollow out centers.
-
Fill centers with crushed candy.
-
Bake for 9–11 minutes until edges are golden and candy has melted.
-
Cool completely before decorating or removing.
-
Optional: Brush edges with syrup and sprinkle glitter or sugar for sparkle.
Notes
Chill dough for best shape. Don’t overfill centers with candy. Store flat in airtight container.