
There’s something undeniably nostalgic and comforting about a cool, creamy pudding layered with ripe bananas, sweet strawberries, and soft vanilla wafers. This Strawberry Banana Pudding Dream captures the heart of Southern-style desserts with a fruity twist that makes it feel both familiar and refreshingly new.
Perfect for summer picnics, holiday gatherings, or anytime you want a fuss-free treat, this no-bake dessert comes together in layers of flavor and texture. You’ll get the creaminess of pudding and whipped topping, the juicy brightness of strawberries, the mellow sweetness of ripe bananas, and the soft crunch of vanilla wafers — all in one spoonful.
Best of all, it requires no oven time. Whether you’re looking to impress guests or just treat your family to something delightful, this dessert is always a crowd-pleaser.
Ingredients Overview
Let’s break down what makes this no-bake dream so magical — and how each component plays a role.
Ripe Bananas
Bananas provide a mellow sweetness and creamy texture. Use bananas that are yellow with a few brown spots for the best flavor — overly green bananas will be too firm and starchy, while very brown bananas are better suited for banana bread.
Tip: To prevent browning, toss sliced bananas in a little lemon juice.
Fresh Strawberries
Strawberries bring tartness and vibrant color. Fresh is best here — washed, hulled, and sliced thin. Avoid frozen berries for this recipe, as they can release too much liquid and make the pudding runny.
Vanilla Pudding
Instant vanilla pudding mix is the base of the creamy layer. It sets quickly and blends beautifully with whipped topping for that signature fluffy texture.
Variation: You can use banana pudding mix for a deeper banana flavor or cheesecake pudding mix for a tangy twist.
Sweetened Condensed Milk
This ingredient adds richness and a touch of caramelized sweetness. It also helps stabilize the pudding so the dessert holds its shape.
Whipped Topping
Cool Whip or any non-dairy whipped topping creates the dreamy, fluffy texture. Fold it gently into the pudding to avoid deflating the mixture.
Alternative: For a homemade version, use freshly whipped cream sweetened with powdered sugar.
Vanilla Wafers
These act like soft cookies that soak up moisture from the pudding and fruit layers. They become tender but not soggy — giving the dessert its iconic layered structure.
Option: Swap with shortbread cookies or graham crackers for a different texture.
Step-by-Step Instructions
Here’s how to build this dreamy dessert — layer by irresistible layer.
1. Make the Pudding Base
In a large mixing bowl, whisk together the instant vanilla pudding mix and cold milk until smooth. Let it sit for 5 minutes to thicken.
In a separate bowl, blend the sweetened condensed milk into the pudding until fully combined and creamy.
Fold in the whipped topping gently with a spatula. The mixture should be light and fluffy — avoid overmixing.
2. Prep the Fruit
Slice the bananas into ¼-inch coins and lightly toss with lemon juice to prevent browning.
Hull and thinly slice the strawberries. If they’re very juicy, pat them dry with a paper towel so they don’t add too much moisture to the dessert.
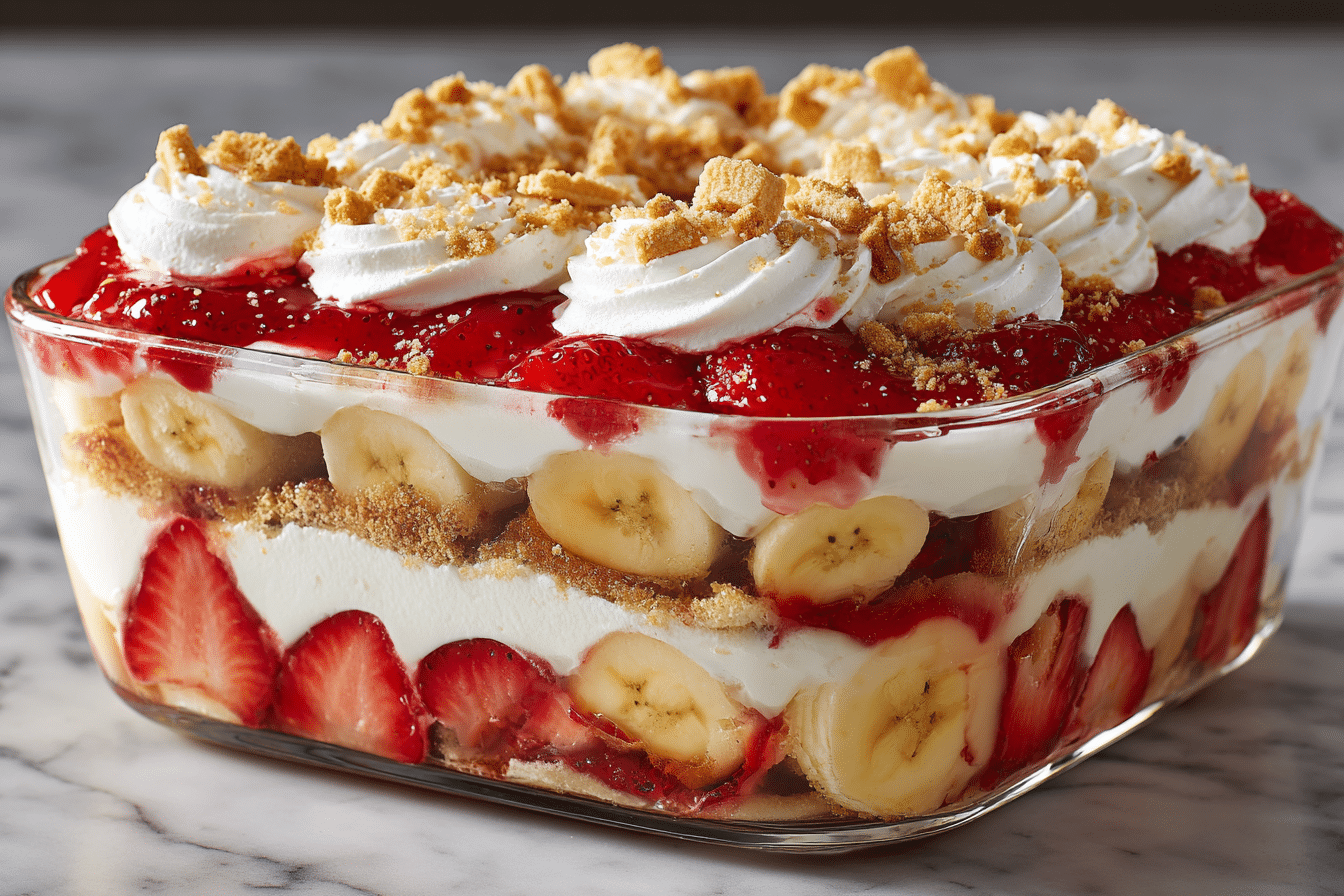
3. Assemble the Layers
In a 9×13-inch dish or trifle bowl, begin with a layer of vanilla wafers to cover the bottom.
Spread one-third of the pudding mixture over the wafers.
Add a single layer of banana slices, followed by a layer of strawberries.
Repeat the layers — wafers, pudding, bananas, strawberries — until you reach the top. End with a thick layer of pudding and a final arrangement of sliced strawberries and crushed wafers for decoration.
4. Chill
Cover the dish with plastic wrap and refrigerate for at least 4 hours, preferably overnight. This allows the wafers to soften and the flavors to meld beautifully.
When ready to serve, scoop out into bowls or glasses and enjoy every silky, fruity bite.
Tips, Variations & Substitutions
-
Make it in Mason jars: Perfect for portioned desserts at parties or picnics. Just layer everything into 8 oz jars with lids.
-
Add texture: Sprinkle toasted coconut or crushed nuts (like pecans or walnuts) between layers for added crunch.
-
Dairy-free option: Use plant-based pudding mix, almond milk, and coconut whipped topping for a fully dairy-free version.
-
Graham cracker crust version: For a more structured dessert, press crushed graham crackers mixed with butter into the bottom of the dish as a crust.
-
Chocolate twist: Add mini chocolate chips or swirl in Nutella between the layers for a decadent variation.
Serving Ideas & Occasions
This no-bake Strawberry Banana Pudding is ideal for:
-
Summer BBQs and potlucks – It holds well in the fridge and can be made a day ahead.
-
Easter or Mother’s Day brunches – Its pastel colors and fruity flavors fit beautifully with spring spreads.
-
Birthday parties and baby showers – Easily dressed up with piped whipped cream and extra fruit on top.
-
Weeknight family dessert – Quick to prepare and loved by kids and adults alike.
Pair it with iced tea, lemonade, or a scoop of vanilla ice cream for an even more indulgent treat.
Nutritional & Health Notes
While this dessert leans on the indulgent side, it offers a few redeeming qualities. Bananas provide potassium, fiber, and vitamin B6, while strawberries are rich in vitamin C and antioxidants.
To make it lighter:
-
Use sugar-free pudding mix and reduced-fat whipped topping.
-
Swap some of the wafers for sliced bananas to cut down on refined carbs.
-
Serve smaller portions in individual cups for portion control.
Keep in mind that while it’s sweet and creamy, this dessert can be adjusted to fit various dietary goals without sacrificing enjoyment.
FAQs
Q1: Can I make this dessert ahead of time?
A1: Absolutely. In fact, this dessert is best when made at least 4 hours in advance, so the layers can meld and the wafers soften slightly. It can be stored in the fridge for up to 3 days.
Q2: What if I don’t have vanilla wafers?
A2: No problem! You can use graham crackers, shortbread cookies, butter biscuits, or even ladyfingers. Just note that each will affect the texture slightly.
Q3: How do I keep bananas from turning brown?
A3: Toss your banana slices in a bit of lemon juice before layering. This helps slow the oxidation process that causes browning.
Q4: Can I freeze this dessert?
A4: It’s not recommended. Freezing affects the texture of the pudding and fruit, making it watery and mushy when thawed. It’s best served fresh from the fridge.
Q5: Can I use homemade pudding instead of instant?
A5: Yes, but make sure the homemade pudding is fully cooled before combining it with whipped topping. This ensures the layers remain fluffy and stable.
Q6: Is it possible to make this gluten-free?
A6: Definitely. Just substitute the vanilla wafers with certified gluten-free cookies or graham-style crackers. Most other ingredients are naturally gluten-free, but always check labels.
Q7: What’s the best dish to use for layering?
A7: A glass trifle bowl makes for a beautiful presentation, allowing you to see the layers. Otherwise, a 9×13-inch baking dish works perfectly for serving a crowd.
PrintEasy Strawberry Banana Pudding – Crazy Good Summer Dessert
A dreamy no-bake dessert layered with creamy vanilla pudding, ripe bananas, fresh strawberries, and soft vanilla wafers — perfect for warm-weather gatherings or easy weeknight treats
- Prep Time: 20 minutes
- Cook Time: 0 minutes
- Total Time: 4 hours (chill time)
- Yield: 12 servings 1x
Ingredients
-
1 box (5.1 oz) instant vanilla pudding mix
-
2 cups cold milk
-
1 can (14 oz) sweetened condensed milk
-
1 tub (8 oz) whipped topping, thawed
-
4–5 ripe bananas, sliced
-
2 cups fresh strawberries, sliced
-
1 box vanilla wafers
-
1 tsp lemon juice (optional, for bananas)
Instructions
-
In a bowl, whisk together pudding mix and milk. Let sit for 5 minutes to thicken.
-
Add sweetened condensed milk to pudding; stir until combined.
-
Gently fold in whipped topping until fluffy and smooth.
-
Slice bananas and toss with lemon juice, if desired. Slice strawberries and pat dry.
-
In a 9×13 dish, layer vanilla wafers, then a layer of pudding, followed by bananas and strawberries.
-
Repeat layers, ending with pudding on top.
-
Garnish with extra strawberries and crushed wafers.
-
Cover and refrigerate for 4 hours or overnight before serving.
Notes
-
For a dairy-free version, use plant-based pudding, milk, and whipped topping.
-
Try graham crackers or shortbread as alternatives to vanilla wafers.
-
Great in individual jars for parties or picnics.