
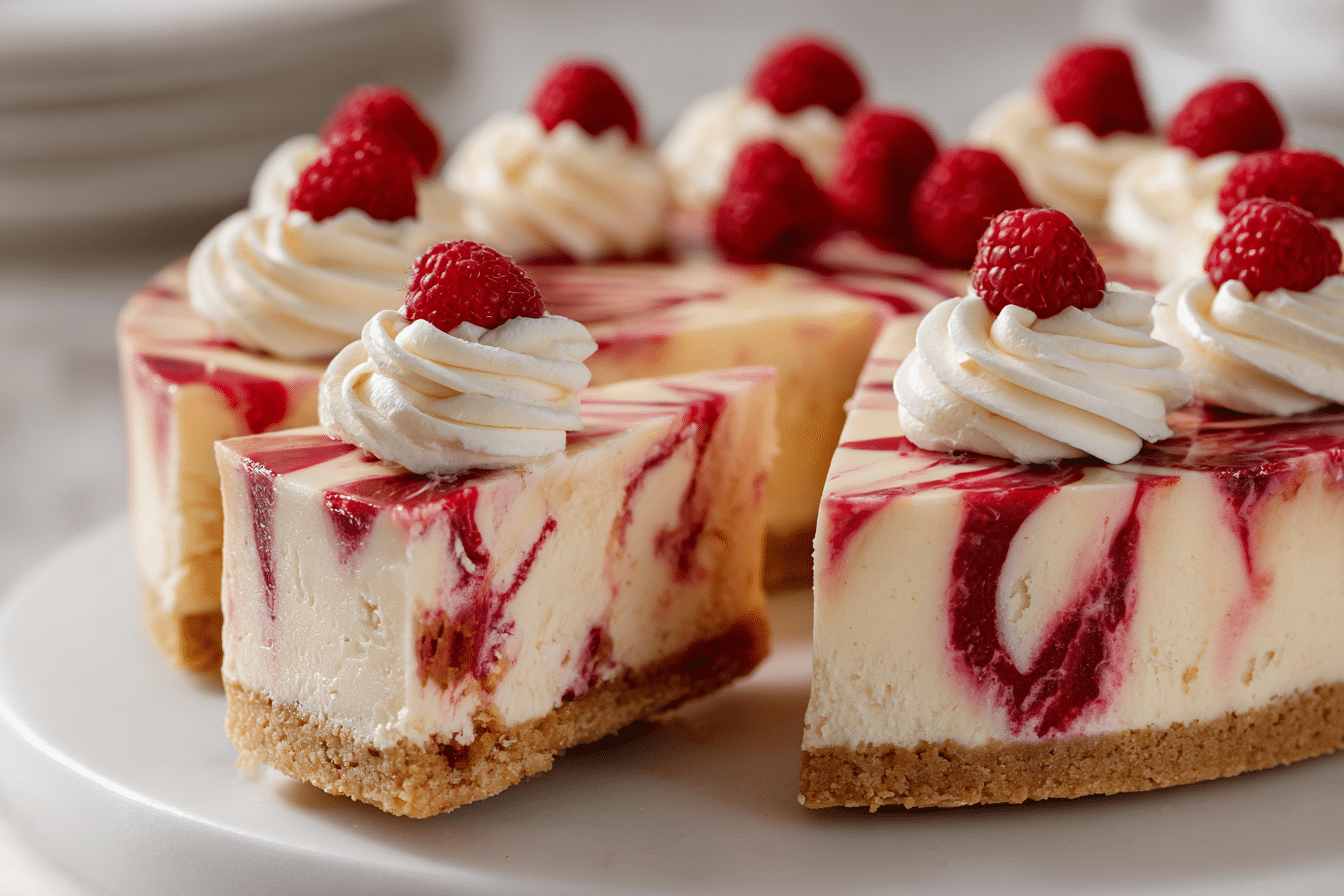
Light, creamy, and bursting with berry flavor, this No-Bake Raspberry Cheesecake is an elegant dessert that’s as easy to make as it is stunning to serve. Based on a popular version from Kookmutsjes, this cheesecake skips the oven and goes straight to the fridge, making it ideal for warm weather, busy days, or any time you want a crowd-pleasing treat without the hassle.
Smooth cream cheese, whipped cream, and a buttery biscuit base are topped with a vibrant raspberry layer — tangy, sweet, and full of natural color. It’s refreshing, rich, and surprisingly simple, with no baking required and minimal cleanup.
Perfect for celebrations, tea time, or a make-ahead dessert, this no-bake raspberry cheesecake will quickly become a favorite.
Ingredients Overview
This cheesecake relies on classic no-bake components that deliver both structure and flavor without an oven. Here’s what each key ingredient brings:
-
Cream cheese: The core of the cheesecake filling. Use full-fat for best texture and taste. It should be softened before mixing.
-
Heavy whipping cream: Whipped and folded in, it lightens the texture and adds volume.
-
Sugar: Typically granulated or powdered, used to sweeten the filling and sometimes the raspberry topping.
-
Vanilla extract: Adds depth and enhances the creamy base.
-
Gelatin or agar-agar: Essential for helping the filling and topping set without baking. Bloom gelatin properly for smooth results.
-
Digestive biscuits or graham crackers: Crushed and mixed with butter for the base. You can also use tea biscuits or Biscoff cookies for added flavor.
-
Butter: Binds the crust together and gives it a rich, crisp texture after chilling.
-
Fresh or frozen raspberries: Used to make a bright, flavorful raspberry topping or compote.
-
Lemon juice: Balances the sweetness and enhances the raspberry flavor.
-
Optional toppings: Whipped cream, extra raspberries, white chocolate shavings, or mint leaves.
All ingredients should be at room temperature for easy mixing, except for the whipping cream (which should be cold for best volume).
Step-by-Step Instructions
This recipe follows a three-layer structure: base, filling, and raspberry topping.
Step 1: Make the Biscuit Base
-
Crush the biscuits
Use about 200g (approx. 2 cups) of digestive biscuits or graham crackers. Crush finely in a food processor or with a rolling pin. -
Mix with butter
Stir in 100g (7 tbsp) of melted unsalted butter until the crumbs resemble wet sand. -
Press into pan
Press the mixture firmly into the bottom of a 9-inch springform pan lined with parchment paper. Chill in the fridge while preparing the filling.
Step 2: Make the Cheesecake Filling
-
Bloom gelatin
In a small bowl, add 2 tsp powdered gelatin to 3 tbsp cold water. Let sit for 5–10 minutes to bloom. -
Whip the cream
In a cold mixing bowl, beat 1 cup (240 ml) of heavy cream to soft peaks. Set aside. -
Mix cream cheese and sugar
In another bowl, beat 450g (16 oz) cream cheese with ½ cup granulated or powdered sugar and 1 tsp vanilla extract until smooth and fluffy. -
Dissolve gelatin
Gently heat the bloomed gelatin (either in the microwave for 10 seconds or over low heat) until just melted. Let cool slightly, then mix into the cream cheese. -
Fold in whipped cream
Carefully fold the whipped cream into the cream cheese mixture in batches until fully combined and airy. -
Pour over crust
Pour the filling over the chilled crust and smooth the top. Refrigerate for at least 4–6 hours, or until set.
Step 3: Make the Raspberry Topping
-
Cook the berries
In a small saucepan, combine 250g (2 cups) fresh or frozen raspberries with 2 tbsp sugar and 1 tbsp lemon juice. Simmer for 5–7 minutes until the raspberries break down. -
Strain (optional)
If you prefer a smooth topping, strain the mixture through a fine sieve to remove seeds. -
Add gelatin
Bloom 1 tsp gelatin in 2 tbsp water. Melt and stir into the warm raspberry sauce. Let cool for 10–15 minutes (it should be pourable but not hot). -
Pour and chill
Pour the cooled raspberry topping over the set cheesecake layer. Refrigerate for another 1–2 hours, or until fully firm.
Tips, Variations & Substitutions
-
Use agar-agar: For a vegetarian version, substitute gelatin with agar-agar (adjust quantity to product instructions — typically less is needed).
-
Swap berries: Use strawberries, blackberries, or mixed berries for a different twist.
-
Add citrus: Mix lemon or orange zest into the filling for brightness.
-
Crust twist: Use Biscoff cookies for a caramelized, spiced base.
-
Individual servings: Assemble in jars or ramekins for single-serve presentation.
Storage tip: This cheesecake keeps well for up to 3 days in the fridge, covered. Avoid freezing the raspberry topping, as it may weep upon thawing.
Serving Ideas & Occasions
This No-Bake Raspberry Cheesecake is a beautiful addition to:
-
Summer gatherings or BBQs – no oven, no sweat.
-
Holiday tables – festive color and creamy texture.
-
Birthday parties – easy to prep ahead.
-
Mother’s Day brunch or baby showers – light, pretty, and flavorful.
-
Dinner parties – pairs wonderfully with espresso or dessert wine.
Garnish with fresh berries, edible flowers, or piped whipped cream for an elegant touch.
Nutritional & Health Notes
Though rich and indulgent, this no-bake dessert offers a good balance when portioned appropriately. It contains calcium from cream cheese, and antioxidants from the raspberries.
Lighter options:
-
Use low-fat cream cheese or Greek yogurt for part of the filling.
-
Reduce sugar and rely on the berries’ natural sweetness.
-
Skip or reduce butter in the crust and opt for thinner layers.
Estimated per slice (1 of 10): ~300–350 calories depending on portion size and toppings.
FAQs
Q1: Can I make this raspberry cheesecake in advance?
Yes! It’s perfect for prepping ahead. You can make it up to 2 days in advance and store covered in the fridge until serving.
Q2: Can I use frozen raspberries?
Absolutely. Just thaw them first or cook them directly for the topping. They work just as well and are often more affordable.
Q3: What if I don’t have gelatin?
You can use agar-agar as a vegetarian substitute. Make sure to dissolve it in boiling liquid and adjust the amount (typically ½ the amount of gelatin).
Q4: Can I freeze this cheesecake?
You can freeze the cheesecake before adding the raspberry topping. Thaw overnight in the fridge before topping and serving.
Q5: How do I prevent the cheesecake from sticking to the pan?
Line the base with parchment paper, and run a hot knife along the edges before releasing the springform pan.
Q6: Can I make it sugar-free?
Yes, substitute with powdered erythritol or monk fruit sweetener in the cream cheese layer and raspberry sauce. Adjust to taste.
Q7: Why didn’t my cheesecake set?
The most common cause is under-bloomed or overheated gelatin. Make sure it fully dissolves and is mixed into the filling evenly. Also, allow enough chill time (minimum 4–6 hours).
Creamy Raspberry Cheesecake with Buttery Cookie Crust
A silky no-bake cheesecake layered with fresh raspberry topping, a creamy mascarpone-style filling, and buttery biscuit base. Light, fruity, and oven-free.
- Prep Time: 30 minutes
- Total Time: 7 hours
- Yield: 10 slices 1x
Ingredients
Crust:
-
200g digestive biscuits or graham crackers
-
100g (7 tbsp) unsalted butter, melted
Filling:
-
450g cream cheese
-
1 cup heavy whipping cream
-
½ cup powdered or granulated sugar
-
½ cup coconut milk (optional)
-
1 tsp vanilla extract
-
2 tsp powdered gelatin + 3 tbsp water
Raspberry Topping:
-
250g fresh or frozen raspberries
-
2 tbsp sugar
-
1 tbsp lemon juice
-
1 tsp gelatin + 2 tbsp water
Instructions
-
Mix crushed biscuits with melted butter. Press into pan and chill.
-
Whip cream to soft peaks. Set aside.
-
Beat cream cheese, sugar, vanilla, and coconut milk.
-
Bloom gelatin, melt, and mix into cream cheese. Fold in whipped cream.
-
Pour filling over crust. Chill 4–6 hours.
-
Cook raspberries, sugar, lemon juice. Strain if desired.
-
Bloom gelatin, melt, stir into sauce. Cool slightly.
-
Pour raspberry topping over set cheesecake. Chill another 1–2 hours.
-
Garnish and serve chilled.
Notes
-
Use agar-agar for vegetarian version.
-
Best enjoyed within 2–3 days.
-
Individual servings possible in jars or cups.