
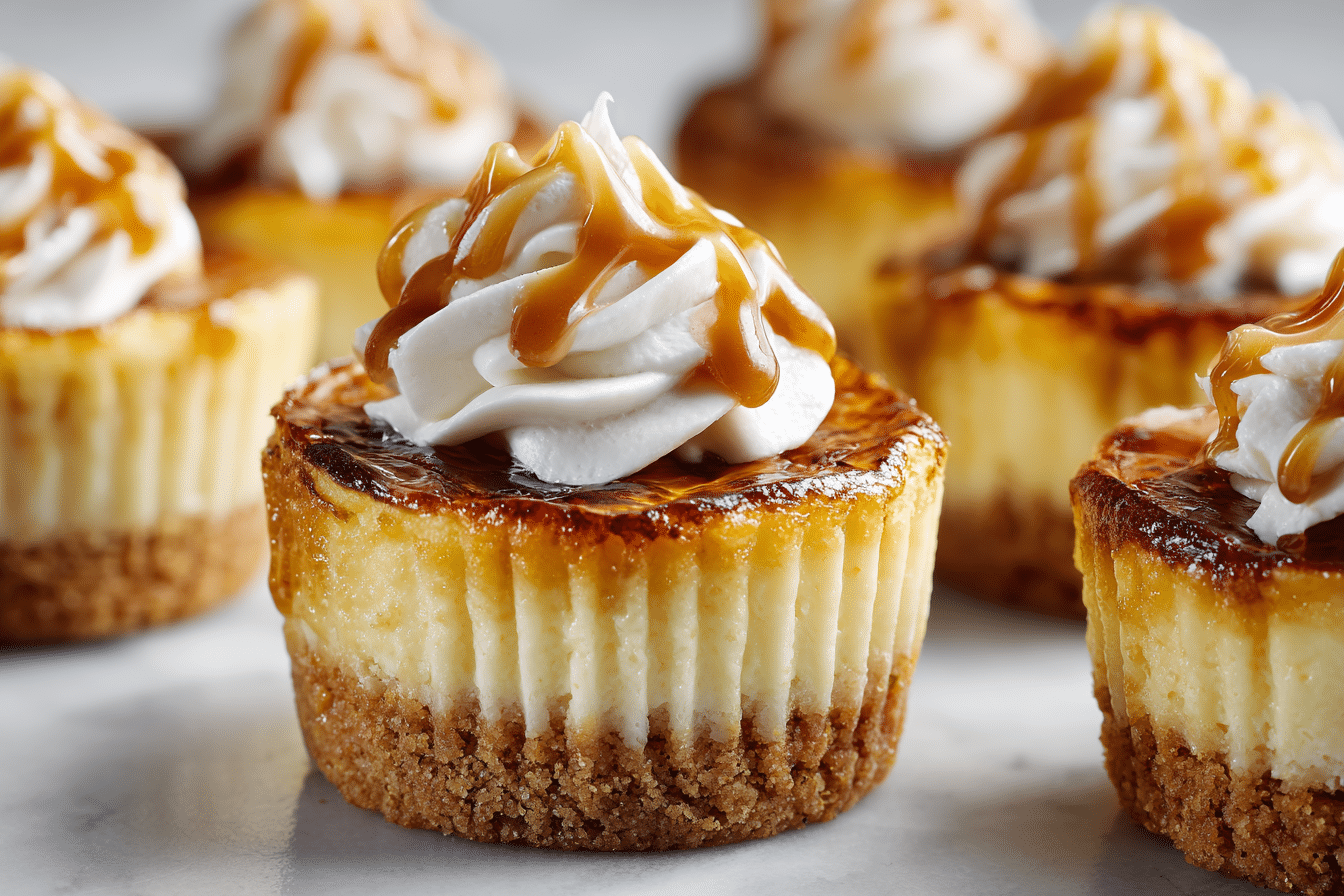
Vanilla bean crème brûlée cheesecake cupcakes are the ultimate fusion of two beloved classics — rich, creamy cheesecake and silky-smooth crème brûlée. With their signature caramelized sugar topping, delicate vanilla bean aroma, and individual portions, these elegant cupcakes are perfect for dinner parties, weddings, or simply treating yourself to something extraordinary.
Imagine a smooth vanilla-speckled cheesecake nestled in a crisp cookie crust, finished with a crackly brûlée sugar top — every bite delivers luxurious texture and deep, aromatic sweetness. These mini desserts may look gourmet, but they’re surprisingly easy to make at home with just a few key ingredients.
Ingredients Overview
Crust:
-
Graham Cracker Crumbs: Classic, lightly sweet and buttery base for the cupcakes.
-
Melted Butter: Helps bind the crust and adds richness.
-
Sugar: A touch to sweeten and enhance flavor.
Cheesecake Filling:
-
Cream Cheese: Full-fat, softened — creates the rich and creamy base.
-
Sour Cream: Adds tang and smooths the texture.
-
Eggs: Help set the filling while keeping it tender.
-
Granulated Sugar: Sweetens the batter without overpowering the vanilla.
-
Vanilla Bean Paste or Seeds: Gives intense flavor and beautiful flecks — substitute with pure extract if needed.
Brûlée Topping:
-
Granulated Sugar: Sprinkled on top and caramelized for that classic crackle.
-
Kitchen Torch: Essential tool for brûlée — gives perfect golden finish.
Step-by-Step Instructions
1. Make the Crust
Preheat oven to 325°F (163°C). Line a muffin tin with paper or foil liners.
In a bowl, combine:
-
1 cup graham cracker crumbs
-
3 tbsp sugar
-
4 tbsp melted butter
Mix until it resembles wet sand. Press about 1 tablespoon into each cupcake liner. Bake for 5 minutes, then set aside.
2. Prepare the Cheesecake Batter
In a large bowl, beat:
-
16 oz (2 blocks) cream cheese, softened
-
½ cup granulated sugar
Beat until smooth and fluffy (about 2–3 minutes).
Add:
-
½ cup sour cream
-
2 large eggs
-
1 ½ tsp vanilla bean paste (or seeds scraped from 1 pod)
Mix until fully combined — don’t overbeat.
3. Fill and Bake
Spoon batter over the crusts, filling each liner nearly to the top.
Bake at 325°F for 18–22 minutes, or until the centers are just set (slight jiggle is okay).
Cool in the tin for 15 minutes, then transfer to a wire rack to cool completely. Chill for at least 4 hours or overnight.
4. Add the Brûlée Finish
Right before serving:
-
Sprinkle 1–2 teaspoons of sugar evenly over each chilled cupcake.
-
Using a kitchen torch, melt the sugar until golden and crisp. Let it cool for 1–2 minutes before serving.
Tip: No torch? Try placing the cupcakes under the broiler for 1–2 minutes, but watch carefully.
Tips, Variations & Substitutions
-
No graham crackers? Use crushed Biscoff, vanilla wafers, or digestive biscuits.
-
Flavor Variations:
-
Add lemon zest to the batter for a bright twist.
-
Use bourbon vanilla for deeper flavor.
-
-
Mini Cheesecake Pan: For extra clean edges, use a mini cheesecake pan with removable bottoms.
-
Brûlée topping too thick? Use superfine sugar for a thinner, even crust.
Serving Ideas & Occasions
-
Elegant Dinner Parties: Serve on a platter with berries or a sprig of mint.
-
Weddings or Showers: Individual, mess-free portions perfect for large groups.
-
Date Nights or Valentine’s Day: A luxurious yet simple dessert for two.
-
Holiday Entertaining: Add sparkle with edible gold flakes or vanilla bean whipped cream.
Nutritional & Health Notes
Each cupcake contains approximately:
-
Calories: ~300–350
-
Fat: ~22g
-
Carbohydrates: ~25g
-
Protein: ~5g
While indulgent, these are portion-controlled and can be made lighter with low-fat cream cheese or Greek yogurt in place of sour cream.
FAQs
Q1: Can I make these without a kitchen torch?
Yes! Use your oven’s broiler — place the sugar-topped cupcakes on a tray and broil on high for 1–2 minutes. Watch closely to avoid burning.
Q2: Can I make them ahead?
Absolutely. Cheesecake cupcakes can be made 2–3 days in advance and stored in the fridge. Brûlée the tops right before serving.
Q3: Do I need a water bath?
Not for this recipe. Because of the small size and lower bake temperature, they bake evenly without cracking.
Q4: How do I know when they’re done?
The centers should look set but jiggle slightly. They’ll continue to firm up as they cool.
Q5: Can I freeze these?
Yes. Freeze without the brûlée topping. Thaw overnight in the fridge, then brûlée before serving.
Q6: What if I don’t have vanilla bean paste?
Use 2 tsp pure vanilla extract instead. The flavor will be lovely, but you’ll miss the signature vanilla flecks.
Q7: How do I store leftovers?
Store in an airtight container in the fridge for up to 4 days. Don’t brûlée until ready to eat for best texture.
PrintCream Brulee Cupcakes – cute gourmet dessert idea
Rich vanilla bean cheesecake cupcakes topped with a crackly crème brûlée sugar crust. A decadent, elegant mini dessert for any occasion.
- Prep Time: 20 minutes
- Chill Time: 4 hours
- Cook Time: 20 minutes
- Total Time: 5hours
- Yield: 12 cupcakes 1x
Ingredients
Crust:
-
1 cup graham cracker crumbs
-
3 tbsp sugar
-
4 tbsp melted butter
Filling:
-
16 oz cream cheese, softened
-
½ cup sugar
-
½ cup sour cream
-
2 eggs
-
1 ½ tsp vanilla bean paste (or 2 tsp extract)
Topping:
-
½ cup sugar (for brûlée)
Instructions
-
Preheat oven to 325°F. Line muffin tin with cupcake liners.
-
Mix crust ingredients and press into liners. Bake 5 minutes.
-
Beat cream cheese and sugar. Add sour cream, eggs, and vanilla.
-
Fill liners with batter. Bake 18–22 minutes. Cool and chill.
-
Sprinkle tops with sugar and brûlée with a torch before serving.
Notes
-
Store chilled; brûlée just before serving.
-
Freeze unfrosted cupcakes up to 1 month.
-
Serve with fresh berries or whipped cream.