
Mini cheesecakes are a delightful twist on the classic dessert, offering all the rich, creamy indulgence of a traditional cheesecake in a perfectly portioned bite. Whether you’re hosting a party, preparing a dessert tray, or just want a treat you can make ahead, these little cheesecakes shine with both simplicity and elegance.
Baked in muffin tins with a cookie crust and silky cream cheese filling, mini cheesecakes are easy to prepare and even easier to serve. There’s no need for water baths or springform pans, yet the result is still impressively smooth and tangy with a subtle sweetness.
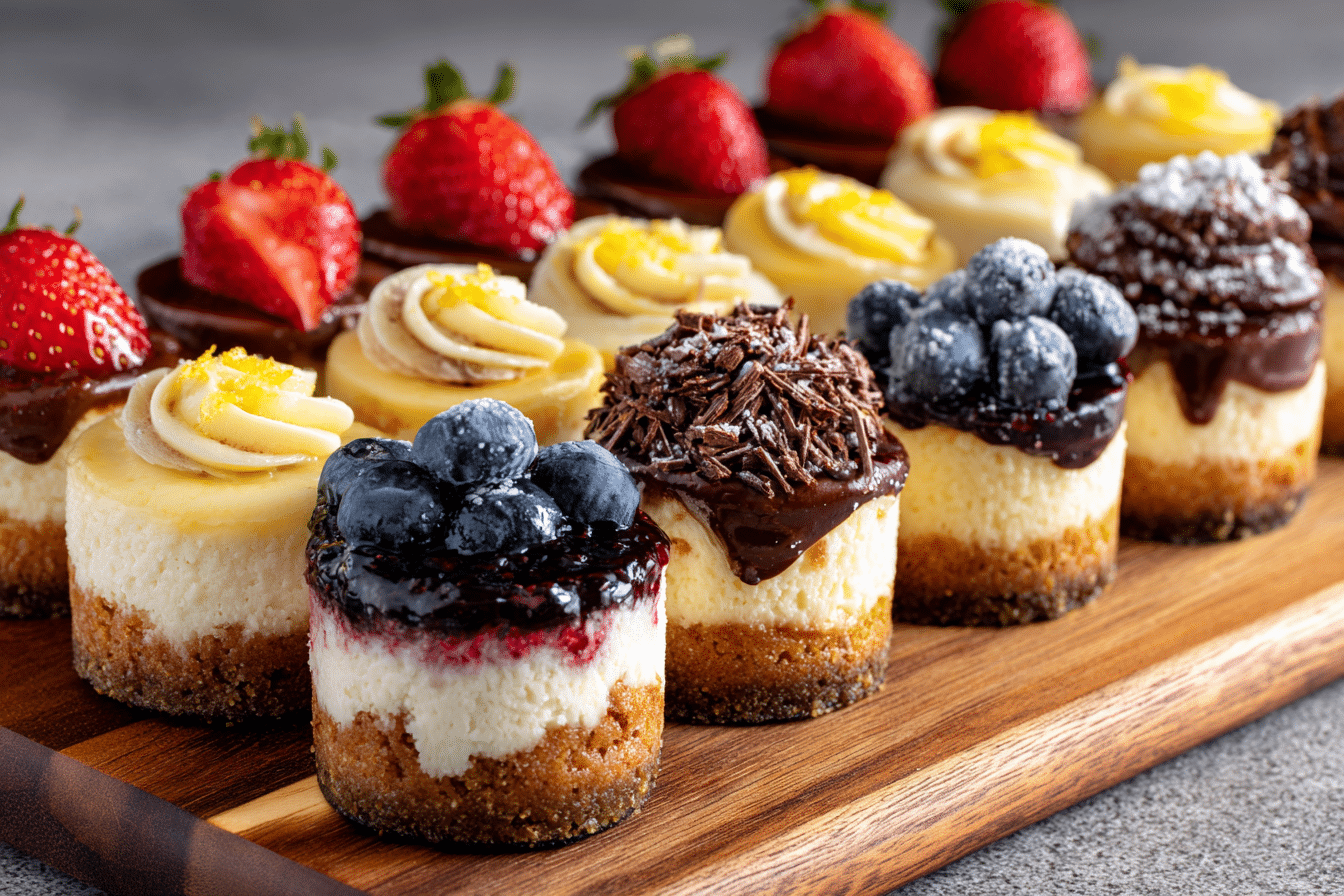
Topped with fruit, chocolate, caramel, or just a simple dollop of whipped cream, these handheld cheesecakes are as versatile as they are irresistible.
Ingredients Overview
Let’s take a closer look at the ingredients that give mini cheesecakes their luxurious flavor and ideal texture.
Cream Cheese
The heart of every cheesecake. Use full-fat cream cheese for the creamiest result, and let it come to room temperature before mixing to avoid lumps.
-
Tip: Avoid whipped or spreadable versions — block cream cheese gives the best structure.
-
Alternative: Plant-based cream cheese works for dairy-free adaptations.
Granulated Sugar
Sweetens the cheesecake base without overpowering the tang of the cream cheese. Use regular white sugar for a smooth blend.
Eggs
Eggs help bind the filling and give it a custardy richness. Room temperature eggs incorporate more evenly into the batter.
-
Tip: Add eggs one at a time and don’t overmix after adding them, to avoid air bubbles and cracking.
Sour Cream or Greek Yogurt
Adds a subtle tang and makes the texture even silkier. It also balances the sweetness.
-
Substitution: Greek yogurt works well for a higher protein version.
Vanilla Extract
Enhances the overall flavor with warm, sweet undertones. A little goes a long way.
Crust: Graham Crackers or Cookies
Traditional mini cheesecakes use crushed graham crackers with melted butter. However, Oreos, Biscoff, or vanilla wafers also make excellent crusts.
-
Tip: Pre-bake the crust briefly to help it hold together better.
Optional Toppings
-
Fresh berries
-
Fruit compote
-
Chocolate ganache
-
Salted caramel
-
Lemon curd
-
Whipped cream
Step-by-Step Instructions
This version uses a standard 12-cup muffin pan with paper liners. Here’s how to make bakery-worthy mini cheesecakes at home.
1. Prep the Oven and Pan
-
Preheat your oven to 325°F (163°C).
-
Line a 12-cup muffin pan with paper liners.
2. Make the Crust
-
Combine 1 cup graham cracker crumbs with 2 tablespoons sugar and 4 tablespoons melted butter.
-
Press about 1 tablespoon of the mixture firmly into each muffin liner.
-
Bake for 5 minutes, then let cool while preparing the filling.
3. Make the Filling
-
In a large bowl, beat 16 oz of softened cream cheese until completely smooth.
-
Add ½ cup sugar and mix until creamy.
-
Blend in ½ cup sour cream and 1 teaspoon vanilla extract.
-
Beat in 2 large eggs, one at a time, mixing just until incorporated.
4. Fill and Bake
-
Divide the filling evenly among the prepared muffin cups (about 2–3 tablespoons each).
-
Tap the pan gently on the counter to release air bubbles.
-
Bake for 16–18 minutes, until the centers are just set and slightly jiggly.
-
Turn off the oven and crack the door open. Let cheesecakes rest inside for 10 minutes to prevent cracking.
5. Cool and Chill
-
Remove from oven and let cool completely at room temperature.
-
Transfer to the fridge and chill for at least 2 hours, or overnight for best texture.
6. Add Toppings
-
Top with fruit, whipped cream, ganache, or whatever you love before serving.
Tips, Variations & Substitutions
Helpful Tips
-
Always bring ingredients to room temperature before mixing.
-
Don’t overbake — the centers should have a slight jiggle when done.
-
Use paper liners for easy removal and clean presentation.
-
Let cheesecakes chill fully for the best flavor and texture.
Flavor Variations
-
Chocolate Swirl: Add a few teaspoons of melted chocolate into the batter before baking.
-
Lemon Mini Cheesecakes: Add 1 tablespoon lemon zest and 1 tablespoon juice to the batter.
-
Berry Topping: Top with fresh blueberries, raspberries, or strawberry slices after chilling.
Dietary Substitutions
-
Gluten-Free: Use gluten-free graham crackers or almond flour crust.
-
Low-Sugar: Replace sugar with a granulated sugar substitute like erythritol.
-
Vegan: Use dairy-free cream cheese, plant-based yogurt, and egg replacers.
Serving Ideas & Occasions
Mini cheesecakes are endlessly customizable and suit any event:
-
Perfect for parties, birthdays, or showers — no slicing needed.
-
Great for holiday dessert tables, paired with pumpkin pie or cookies.
-
Add to brunch buffets alongside fruit salad and pastries.
-
Serve chilled in summer with fresh berries or lemon curd for a refreshing finish.
-
Try with espresso or dessert wine for an elegant dinner pairing.
They’re pretty enough for display, yet comforting enough for casual snacking.
Nutritional & Health Notes
While indulgent, mini cheesecakes offer manageable portion control. Each one satisfies sweet cravings without the temptation of a full cake.
-
Calories: Around 180–220 per mini cheesecake, depending on toppings and crust.
-
Protein: Each contains a few grams thanks to the cream cheese and egg.
-
Health Adjustments:
-
Use Greek yogurt to boost protein and lower fat.
-
Swap out the crust for almond meal for a low-carb option.
-
Top with fruit instead of syrups to cut sugar.
-
Their built-in portion size makes them a smart option when you want a treat without overindulging.
FAQs
Q1: Can I freeze mini cheesecakes?
A1: Yes! Once fully cooled, you can freeze them (without toppings) for up to 2 months. Wrap individually in plastic wrap, then store in a freezer bag. Thaw overnight in the fridge before serving.
Q2: Why did my mini cheesecakes crack?
A2: Overbaking or rapid cooling causes cracking. Bake until just set, and always cool gradually — first in the oven with the door cracked, then on the counter before chilling.
Q3: Do I need a water bath for mini cheesecakes?
A3: No, that’s one of their best features! Because of the small size and even heat distribution in muffin pans, a water bath isn’t necessary.
Q4: How do I make mini cheesecakes without liners?
A4: Grease each muffin cup well or use a silicone muffin pan for easy release. Cool completely before removing with a thin knife or offset spatula.
Q5: Can I make these ahead of time?
A5: Definitely. Mini cheesecakes are ideal make-ahead desserts. Chill them overnight, and decorate just before serving.
Q6: What’s the best topping for mini cheesecakes?
A6: Fresh fruit, lemon curd, or whipped cream are light and crowd-pleasing. For something richer, try ganache or salted caramel drizzle.
Q7: Can I bake these in mini muffin pans?
A7: Yes! Reduce baking time to about 10–12 minutes. These bite-sized versions are perfect for dessert platters or parties.
PrintBite-Size Mini Cheesecakes with Strawberry, Chocolate & Lemon Toppings
Creamy, single-serve mini cheesecakes baked in muffin tins with a buttery crust and endless topping options. Ideal for parties and make-ahead desserts.
- Prep Time: 15 minutes
- Cook Time: 18 minutes
- Total Time: 2 hours 45 minutes (includes chilling)
- Yield: 12 mini cheesecakes 1x
Ingredients
-
1 cup graham cracker crumbs
-
2 tbsp sugar
-
4 tbsp unsalted butter, melted
-
16 oz cream cheese, softened
-
½ cup granulated sugar
-
½ cup sour cream
-
1 tsp vanilla extract
-
2 large eggs
Instructions
-
Preheat oven to 325°F. Line a 12-cup muffin pan with paper liners.
-
Mix graham crumbs, sugar, and melted butter. Press 1 tbsp into each liner.
-
Bake crusts for 5 minutes. Cool while making filling.
-
Beat cream cheese until smooth. Add sugar, mix well.
-
Add sour cream and vanilla. Mix in eggs one at a time.
-
Divide filling among cups. Tap pan gently to release air bubbles.
-
Bake for 16–18 minutes, until centers are slightly jiggly.
-
Turn off oven, crack door, and let rest 10 minutes.
-
Cool to room temp, then chill at least 2 hours.
-
Top as desired before serving.
Notes
Use different crusts or toppings for variety. Store in fridge up to 5 days, or freeze up to 2 months without toppings.