
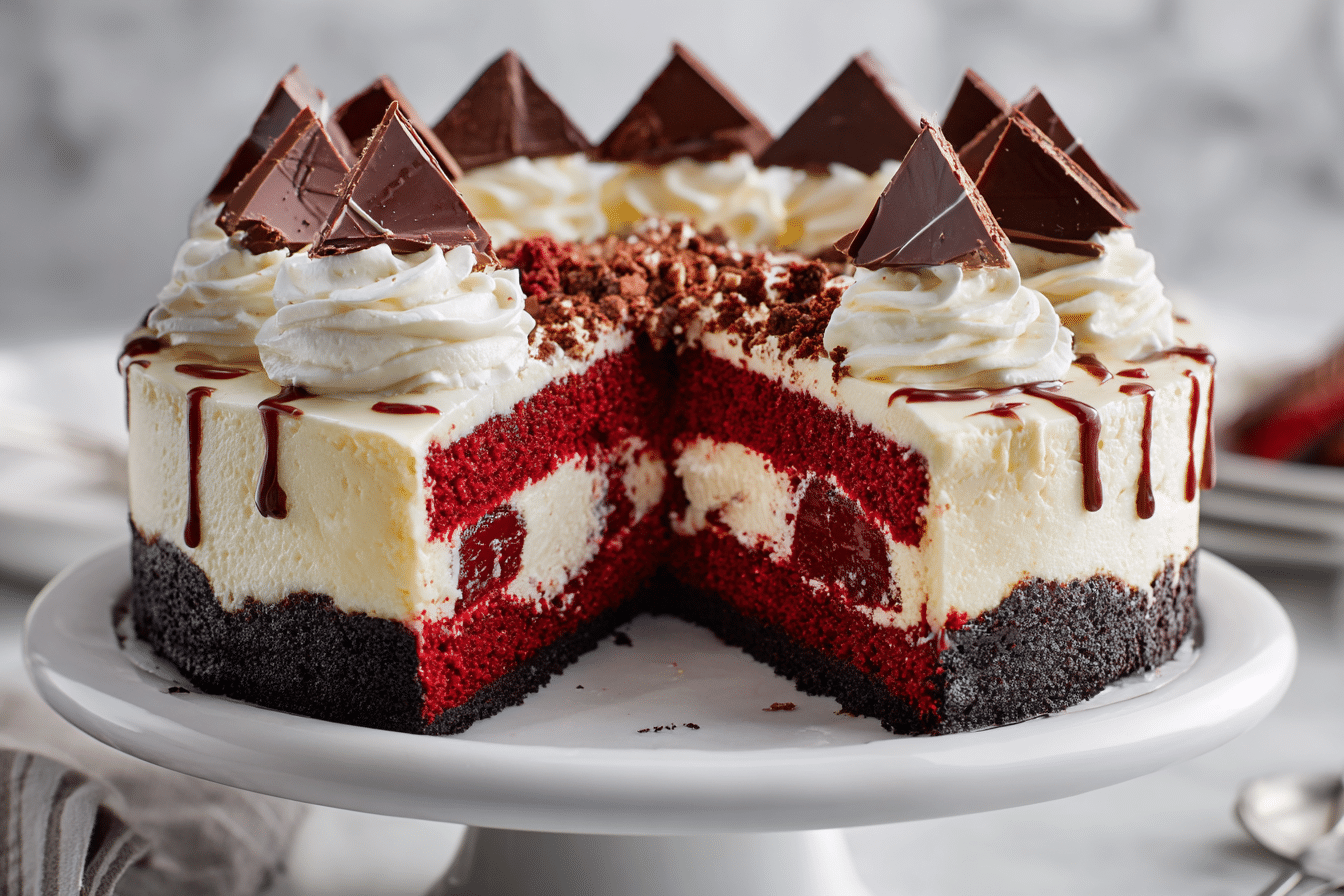
This red velvet cheesecake layer cake is a jaw-dropping fusion of two beloved desserts: rich red velvet cake and creamy New York-style cheesecake. It’s the ultimate indulgence for special occasions — combining the fluffy, cocoa-kissed tang of red velvet with the dense, velvety texture of cheesecake, all wrapped in a luscious cream cheese frosting.
Originally popularized by Southern bakers, red velvet cake has become a classic for its distinctive red hue, tender crumb, and subtle chocolate flavor. Layering it with a smooth cheesecake creates a dessert that’s not only visually stunning but also a dream in every bite — tangy, sweet, and satisfyingly rich.
Perfect for birthdays, Valentine’s Day, holidays, or anytime you want to impress a crowd, this cake is worth every step.
Ingredients Overview
Each layer in this cake brings something special. Let’s break down the components and offer tips and substitutions along the way.
Red Velvet Cake Layers
-
All-Purpose Flour: Gives the cake its soft, sturdy structure. Sift it to avoid clumps and keep the crumb light.
-
Unsweetened Cocoa Powder: Just a hint gives red velvet its signature subtle chocolate flavor. Don’t overdo it — red velvet isn’t meant to taste like chocolate cake.
-
Baking Soda + Vinegar: These create a light, airy rise and help give red velvet its traditional tang.
-
Buttermilk: Essential for that soft, tender crumb and slightly tangy flavor. You can make a quick substitute using milk plus lemon juice or vinegar.
-
Sugar: Granulated white sugar keeps the cake sweet and soft without being overpowering.
-
Eggs: Provide structure and help the layers hold together.
-
Vegetable Oil: Adds moisture without the density of butter. You can substitute melted coconut oil or avocado oil for a more natural twist.
-
Red Food Coloring: Gives red velvet its dramatic look. Gel coloring works best for vibrancy with less liquid.
-
Vanilla Extract: Balances out the tang with warm sweetness.
Cheesecake Layer
-
Cream Cheese: Full-fat cream cheese is essential for richness and structure. Soften it to room temperature before mixing.
-
Sugar: Just enough to sweeten without overpowering the tanginess.
-
Sour Cream: Adds extra creaminess and balances flavor.
-
Eggs: Bind the cheesecake without making it overly firm.
-
Vanilla Extract: Enhances the creamy flavor.
Cream Cheese Frosting
-
Cream Cheese + Butter: This combo gives a smooth, spreadable texture. Use room temperature ingredients for best results.
-
Powdered Sugar: Adds sweetness and thickness. Sift it to prevent lumps.
-
Vanilla Extract: A touch of warmth in every bite.
-
Heavy Cream (optional): For extra silkiness if you want to whip the frosting slightly.
Step-by-Step Instructions
This cake is made in three parts: cheesecake, red velvet layers, and frosting. It’s best to spread the process over two days for ease and precision.
1. Make the Cheesecake Layer
-
Preheat your oven to 325°F (160°C). Line the bottom of a 9-inch springform pan with parchment and lightly grease the sides.
-
In a mixing bowl, beat softened cream cheese and sugar until smooth and fluffy (2–3 minutes).
-
Add eggs one at a time, mixing gently. Scrape down the bowl to avoid lumps.
-
Stir in sour cream and vanilla until fully combined.
-
Pour the mixture into the prepared pan. Tap on the counter to remove air bubbles.
-
Bake for 45–55 minutes, or until the center is just set and slightly wobbly.
-
Cool completely in the pan, then refrigerate for at least 4 hours (or overnight) before layering.
2. Make the Red Velvet Cake Layers
-
Preheat oven to 350°F (175°C). Grease and line two 9-inch round cake pans with parchment.
-
In a medium bowl, whisk together flour, cocoa, baking soda, and salt.
-
In a large bowl, beat eggs, sugar, and oil until smooth.
-
Mix in buttermilk, vanilla, vinegar, and food coloring.
-
Add dry ingredients in batches, mixing until just combined. Do not overmix.
-
Divide batter evenly between the pans.
-
Bake for 25–30 minutes or until a toothpick comes out clean.
-
Cool in pans for 10 minutes, then transfer to wire racks to cool completely.
3. Prepare the Frosting
-
Beat butter and cream cheese until light and fluffy.
-
Add powdered sugar in batches, beating well after each addition.
-
Stir in vanilla and a splash of heavy cream, if using, to loosen the texture slightly.
-
Chill briefly if the frosting is too soft.
4. Assemble the Cake
-
Level the red velvet cake layers with a serrated knife if needed.
-
Place one red velvet layer on your cake stand or plate.
-
Top with the chilled cheesecake layer (remove from springform pan carefully).
-
Add the second red velvet layer on top.
-
Apply a crumb coat of frosting and chill for 20 minutes.
-
Frost the entire cake generously with the remaining cream cheese frosting.
-
Optional: decorate with cake crumbs, white chocolate curls, or fresh berries.
Tips, Variations & Substitutions
-
Make Ahead: Bake the cheesecake layer the day before. You can also freeze it (wrapped well) for up to 2 weeks.
-
Chocolate Cheesecake Twist: Add 2 tablespoons cocoa powder to the cheesecake batter for a chocolatey variation.
-
No Food Coloring? Substitute with beet powder or simply skip — the flavor will remain intact.
-
Mini Cakes: Use 6-inch pans to create personal-sized layer cakes. Adjust baking time accordingly.
-
Nutty Crunch: Add finely chopped pecans or walnuts to the frosting or as a garnish for texture.
-
Gluten-Free Option: Use a gluten-free all-purpose flour blend and check all other ingredient labels.
-
Dairy-Free Version: Use vegan cream cheese, plant-based milk, and dairy-free butter. Note that texture may vary slightly.
Serving Ideas & Occasions
This cake is best served chilled or at room temperature. Here are a few ways to enjoy it:
-
Celebration Centerpiece: It’s perfect for birthdays, anniversaries, or holidays like Christmas or Valentine’s Day.
-
Elegant Dessert Table: Slice into clean, tall layers and serve with coffee or dessert wine.
-
Gift a Slice: Wrap individual slices in parchment and box them up for friends and neighbors.
-
Pairing Ideas: Enjoy with espresso, black tea, or a glass of cold milk for a balanced treat.
Nutritional & Health Notes
This dessert is indulgent by design, but here’s what to keep in mind:
-
Portion Control: A small slice goes a long way thanks to the richness of the cheesecake and frosting.
-
Calories: Expect 550–700 calories per slice depending on portion size and frosting amount.
-
Protein & Calcium: Cream cheese and eggs offer protein and calcium.
-
Lower Sugar Tips: You can reduce the sugar in the cake and frosting slightly without affecting texture.
-
Freezer-Friendly: Leftovers freeze well — slice and wrap individually for best storage.
FAQs
Q1: Can I make the cheesecake and cake layers ahead of time?
A1: Yes, both can be made a day or two in advance. Wrap and chill them separately until ready to assemble.
Q2: Can I use a boxed red velvet cake mix?
A2: You can! Bake according to the package instructions in two 9-inch pans. It’s a time-saving shortcut with great results.
Q3: How do I store this cake?
A3: Keep refrigerated due to the cream cheese frosting and cheesecake layer. Store in an airtight container for up to 5 days.
Q4: Can I freeze this layer cake?
A4: Yes. Freeze slices or the whole cake tightly wrapped in plastic and foil for up to 2 months. Thaw overnight in the fridge.
Q5: Why is my cheesecake layer too soft?
A5: It may have been underbaked or not chilled long enough. Let it set fully in the fridge before assembling the cake.
Q6: How do I get clean slices?
A6: Use a sharp, hot knife (run under warm water) and wipe between cuts for bakery-style presentation.
Q7: Can I make this into cupcakes?
A7: It’s tricky due to the cheesecake layer, but you can swirl cheesecake batter into red velvet cupcake batter and bake in liners for a hybrid cupcake version.
Best Red Velvet Cheesecake with Cake Layers
This decadent red velvet cheesecake layer cake combines soft red velvet layers with creamy cheesecake and rich cream cheese frosting. A showstopper for any celebration.
- Prep Time: 45 minutes
- Cook Time: 1.5 hours
- Total Time: 6–8 hours with chilling
- Yield: 12 slices 1x
Ingredients
Red Velvet Cake Layers
-
2 ½ cups all-purpose flour
-
2 tbsp unsweetened cocoa powder
-
1 tsp baking soda
-
½ tsp salt
-
1 ½ cups sugar
-
1 cup vegetable oil
-
2 large eggs
-
1 cup buttermilk
-
1 tsp vanilla extract
-
1 tsp white vinegar
-
2 tbsp red food coloring
Cheesecake Layer
-
2 (8 oz) packages cream cheese, softened
-
½ cup sugar
-
2 large eggs
-
½ cup sour cream
-
1 tsp vanilla extract
Cream Cheese Frosting
-
16 oz cream cheese, softened
-
1 cup unsalted butter, softened
-
4 cups powdered sugar, sifted
-
2 tsp vanilla extract
-
2–3 tbsp heavy cream (optional)
Instructions
-
Cheesecake: Preheat oven to 325°F. Beat cream cheese and sugar until smooth. Add eggs one at a time, then sour cream and vanilla. Pour into lined springform pan. Bake 45–55 min. Cool and chill completely.
-
Cake Layers: Preheat oven to 350°F. Grease two 9-inch pans. Mix dry ingredients. Beat eggs, oil, sugar. Add buttermilk, vanilla, vinegar, and red food coloring. Combine wet and dry. Divide into pans and bake 25–30 min. Cool.
-
Frosting: Beat cream cheese and butter until smooth. Add powdered sugar in batches. Mix in vanilla and cream if using.
-
Assemble: Layer red velvet cake, cheesecake, then second cake layer. Frost top and sides. Chill before serving
Notes
Cheesecake layer can be made ahead. For clean slices, use a warm knife. Store in fridge up to 5 days or freeze.